|
|

Happy Birthday KBB, Hip Hip Hoera! This is my second birthday with KBB but KBB itself is celebrating it’s 3rd birthday and on this very birthday we can choose our own task from all the previous task that KBB. I chose this pizza since I didn’t participate in this task and also I never made my own pizza base before (In Holland, I have made pizza base many times before in Indonesia)
One word from me, don’t hesitate to make this at home, the dough was smooth literally after 5-7 minutes, so no big energy required here 😉
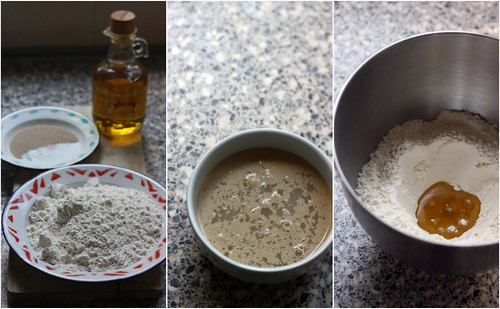
Pizza base:
– 1 sachet (@ 7g = 1/4 oz = 2 tsp) dry yeast
– 1tsp sugar
– 2 ½ cups bread flour (high-grade flour, tepung protein tinggi)
– Salt (I used 1/4 tsp)
– 2 tbsp olive oil
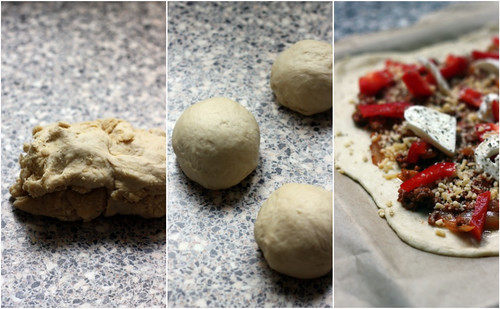
Direction:
– Dissolve the yeast and sugar in a small bowl with 200ml (6 ½ fl oz) of tepid water. Stir well and set aside for 10 minutes, or until the mixture froths.
– Place the flour and a pinch of salt in a large mixing bowl. Make a well in the centre and add the yeast mixture and olive oil. Mix until a firm dough forms. Knead on a lightly floured surface for 5-7 minutes, or until smooth and elastic.
– Place in a clean, lightly oiled bowl, cover with a cloth or plastic wrap and leave in a warm place for 1-1 ½ hours, or until the dough has doubled in size. Preheat the oven to 210C (415F, Gas Mark 6-7).-
– Punch down the dough with your fist to release the air. Divide into two or three equal portions and roll out or press to a thickness of 4-5mm (¼ in). Transfer to lightly oiled pizza trays.
-Top with your choice of toppings and cook for 15 minutes. Then slide the pizza off the tray onto the oven shelf and cook for a further 3-4 minutes, to crisp up the base.
Source: The Perfect Cookbook. David Herbert. Viking. Victoria,Australia. 2003

Bolognese Topping:
– 1/2 portion of bolognese sauce
– 1 red bell pepper sliced
– Shredded Gouda Cheese
– 1 ball fresh mozzarelle cheese

![masakbareng[1]](../../wp-content/uploads/masakbareng13.png)
My better half does like fish but not those with strong fish smell or taste, is that weird or what? Though after looking at people around me, most people here don’t like the kind of fish that we like with strong fish smell and taste such as pempek palembang, siomay, batagor or even ikan pindang. This fish and chips he does like because the fish was white with delicate flavour and texture, one of his favorite.
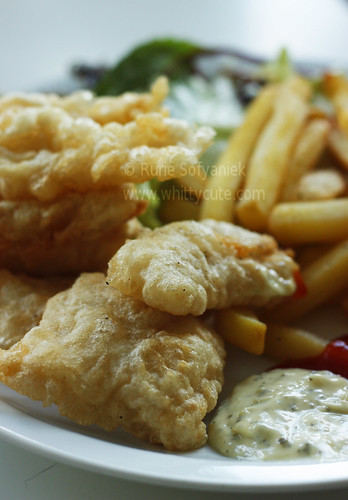
Ingredients:
– 650g (approx) skinless haddock, hake or cod fillet from a sustainable source, cut into 4 equal-size pieces
– 50g self-raising flour , plus 1 tbsp
– 50g cornflour
– 1 egg white
– 125ml ice-cold sparkling water
– 1 lemon cut into wedges
– 600ml sunflower oil , for frying
Directions:
– Pat the fillets dry with paper towels. Put the 1 tbsp of flour on a plate and use to coat each fillet, patting off the excess.
– Pour the oil for frying into a heavy, medium non-stick wok or wokshaped pan. Heat to 200C (use a thermometer so you can check the oil stays at that temperature).
– Mix 50g flour, cornflour, a pinch of salt and some pepper. Lightly whisk the egg white with a balloon whisk until frothy and bubbly, but not too stiff. Pour the water into the flour mix, gently and briefly whisking as you go. The batter shouldn’t be completely smooth. Add the egg white, then lightly whisk in just to mix. Try and keep as many bubbles as you can so the batter stays light.
– Cooking two pieces of fish at a time, dip them in the batter to coat, let some of it drip off, then lower into the hot oil using a slotted spoon. Fry for 5-6 mins, making sure the oil stays at 200C and turning the fish over halfway through so it is golden all over. Lift out with a slotted spoon, drain on kitchen paper. Check the oil is back up to 200C, then repeat with remaining fish. Serve the fish with chips and lemon wedges.
Source: BBC GoodFood

From top left to bottom right; Nastar (Pineapple Tart), Putri Salju (Snow White Cookies), Pizza Cheese Button, Cornflake Cookies. (Recipe will follow soon)
![masakbareng[1]](../../wp-content/uploads/masakbareng12.png)
I know summer’s almost over, the past week has been nothing but bad weather. Yesterday we were on our way home from a friend’s birthday, it was still 8pm but the sky was like nothing like I’ve ever seen, black on one side with a flash of lightning every 5 minutes. We thought where did the summer go? But anyway we could still enjoy summer from these photos when we BBQ-ed couple weeks ago. We made some simple BBQ of vegetable satay (mushroom, onion bell pepper), shrimp, sausage, chicken wing, salad and not forgetting very easy yet delicious grilled potato. I’m going to share the recipe for the grilled potato here, though it was not an extravaganza but it was so good I had to share it with you all. I don’t know whether it was because it was grilled potato or the spices or the final touch of sourcream. Anyway lets enjoy this grilled potato and the rest of the summer before it’s gone before your eyes.
For all of you who are interested in joining MasBar do stop by at our site.

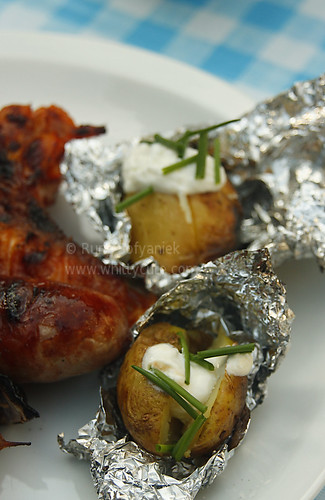
For 4 persons
Ingredietns:
– 8 medium firm potatoes
– Olive oil
– 4 garlic smoothyly pounded
– Salt
– 1 tsp dried rosemary
– Chopped chives
– 1 small tub sourcream
Directions:
– Wash the potatoes but don’t peel them, when they are cleaned prick the potatoes with fork.
– In a bowl mix olive oil, salt and rosemary and rub the mixture on the potatoes. Meanwhile cut 8 squares of aluminium foil and wrap the potatoes individually. Pour the remaining olive oil mixture in the potato package.
– Baked the potatoes straight inside the BBQ for 20 minutes while not forgetting to turn them once a while.
– Serve with chopped chive and a dollop of sourcream
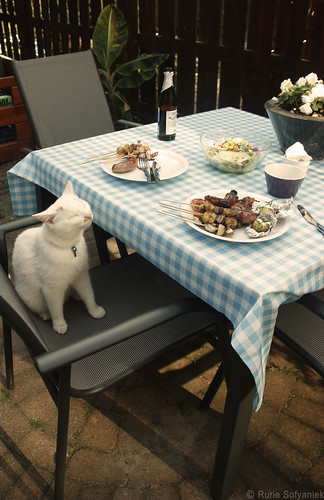
This one’s suppose to be British comfort food, I’d say the same like our Nasi Goreng? But it seems this one has become my better half comfort food as well which I don’t mind to make because it’s so easy, stir fry the mince and boil potatoes then pop everything in the oven.
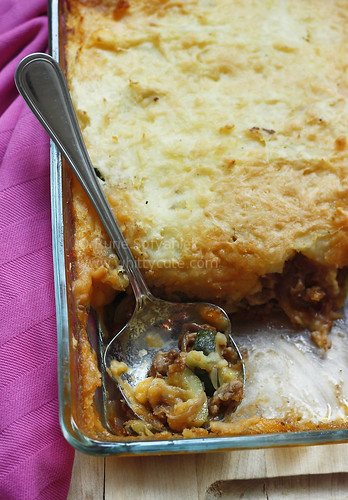
I discovered this recipe at BBC GoodFood but this was way too much only for the two of us so I only used 1/4 recipe for two persons.
Ingredients:
– 3 tbsp olive oil
– 1¼ kg beef mince
– 2 onions , finely chopped
– 3 carrots , chopped (I used courgette)
– 3 celery sticks, chopped (I omitted this)
– 2 garlic cloves , finely chopped
– 3 tbsp plain flour
– 1 tbsp tomato purée
– large glass red wine (optional) (I omitted this)
– 850ml beef stock
– 4 tbsp Worcestershire sauce
– few thyme sprigs
– 2 bay leaves
For the Mash:
– 1.8kg potatoes, chipped
– 225ml milk
– 25gr butter
– 200gr strong cheddar (I used Gouda Cheese)
– Freshly grated nutmeg
Directions:
– Heat 1 tbsp oil in a large saucepan and fry the mince until browned – you may need to do this in batches. Set aside as it browns. Put the rest of the oil into the pan, add the vegetables and cook on a gentle heat until soft, about 20 mins. Add the garlic, flour and tomato purée, increase the heat and cook for a few mins, then return the beef to the pan. Pour over the wine, if using, and boil to reduce it slightly before adding the stock, Worcestershire sauce and herbs. Bring to a simmer and cook, uncovered, for 45 mins. By this time the gravy should be thick and coating the meat. Check after about 30 mins – if a lot of liquid remains, increase the heat slightly to reduce the gravy a little. Season well, then discard the bay leaves and thyme stalks.
– Meanwhile, make the mash. In a large saucepan, cover the potatoes in salted cold water, bring to the boil and simmer until tender. Drain well, then allow to steam-dry for a few mins. Mash well with the milk, butter, and three-quarters of the cheese, then season with the nutmeg and some salt and pepper.
– Spoon meat into 2 ovenproof dishes. Pipe or spoon on the mash to cover. Sprinkle on the remaining cheese. If eating straight away, heat oven to 220C/200C fan/gas 7 and cook for 25-30 mins, or until the topping is golden. Or follow the steps (below) to freeze.
Source: BBC GoodFood

I first saw this in Paris couple years ago and immediately thought wow what a cute little morsels, so pretty with many colors and flavour but darn they weren’t cheap either. Ever since I bump into macarons here and there over the net but never did I got the guts to try it out, for I heard that they weren’t easy to make hence the price tag. Until earlier this month we at KBB received the challenge that I had to make it but I would be forever thankful to KBB, if not for this challenge I don’t know when would I have the courage.
As I ran out of time to do some try outs, so this was my first ever macarons and I think they turned out not so bad. I got the s0-called feet, YAY. Moreover I love this macarons more than shop bought version since this I found not too tooth achingly sweet, just perfect with a cup of coffee.
All in all some conclusion that I could make:
– Important to not over whip your egg white.
– Do not overbeat.
– Let it stand outside for aproximately 1 hour.
– Make sure the oven temperature is low at 140C.
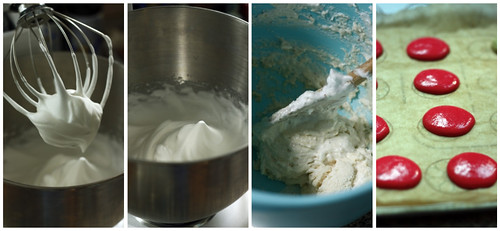
Basic French Meringue
For the shells:
– 90 gr egg whites (use eggs whites that have been preferably left 3-5 days in the fridge)
– 25 gr granulated sugar
– 200 gr powdered sugar
– 110 gr almonds (slivered, blanched, sliced, whatever you like) (I used almond meal)
– (I used 1 drop red gel food coloring)
Prepare the macarons:
– In a stand mixer fitted with the whisk attachment, whip the egg whites to a foam, (think bubble bath foam) gradually add the sugar until you obtain a glossy meringue (think shaving cream). Do not overbeat your meringue or it will be too dry.
– Place the powdered sugar and almonds and powdered color in a food processor and give them a good pulse until the nuts are finely ground.
– Add them to the meringue, give it a quick fold to break some of the air and then fold the mass carefully until you obtain a batter that falls back on itself after counting to 10.
– Give quick strokes at first to break the mass and slow down. The whole process should not take more than 50 strokes. Test a small amount on a plate: if the tops flattens on its own you are good to go. If there is a small beak, give the batter a couple of turns.
-Fill a pastry bag fitted with a plain tip (Ateco #807 or #809) with the batter and pipe small rounds (1.5 inches in diameter) onto parchment paper or silicone mats lined baking sheets.
– Let the macarons sit out for 30 minutes to an hour to harden their shells a bit. In the meantime, preheat the oven to 280F.
– When ready, bake for 15 to 20 minutes, depending on their size. Let cool. Once baked and if you are not using them right away, store them in an airtight container out of the fridge for a couple of days or in the freezer.

White Chocolate Raspberry Ganache:
– 1/2 cup cream
– 1 1/2 cup white chocolate
– 1/3 cup good quality raspberry jam
– Heat the cream until hot, drom white chocolate and raspberry jam into the cream and stir until all are melted and come together.
– Let cool and firm enough to pipe or spoon onto the macarons shells.
Source: Helen Dujardin

![masakbareng[1]](../../wp-content/uploads/masakbareng11.png)
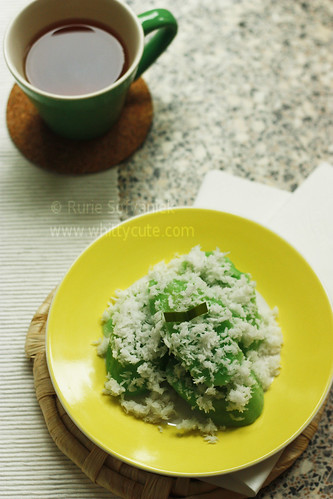
When I was making the batter for this dish yesterday, Masbul thought immediately whether I was making pisang goreng (fried banana). The batter for this dish was indeed similar with the one for pisang goreng but instead of frying the batter, we boiled it. This dish is not as popular as it’s fried version, I suppose Indonesians prefer fried snack than boiled. It’s too bad since I find it’s as nice as pisang goreng while being not too heavy and greasy but nevertheless Masbul made a point after having tasted this dish that he prefered pisang goreng than this one. *Sigh

For 2 portions:
– 1 banana (if you could grab plantain, that’s even better)
– 75 gr rice flour
– 100-150ml water
– Some drops of pandan essence
– 1 pandan leaf
– Steamed grated coconut (I used instant grated coconut)
– Pinch of salt
Directions:
– Cut banana into bite size pieces. Mix rice flour, salt, pandan essence and water into thick consistency.
– Coat banana generously with the batter, meanwhile boil a pan of water with the pandan leaf.
– When the water has boiled, dip the banana batter and boil with low fire for approximately 10 minutes.
– Drain with slotted spoon and served with steamed grated coconut.
It’s not blueberry season yet but I got this urge to make them, not sure why. Then as I shopped at the local supermarket I found this frozen blueberry with very reasonable price so without further ado I snapped it and brought it home, err of course by paying it first. Back home I suddenly remembered that I was still on the quest of finding just the right muffin recipe, a muffin that would go up high but yet still soft and moist in the inside. After much browsing here and there I came across Eliza’s muffin recipe and was so impressed with her review I just wanted to try the recipe instantly. Boy did I make the right the decision, the muffins were super easy to make yet the result was excellent, dome high, buttery moist muffin, highly recommended.
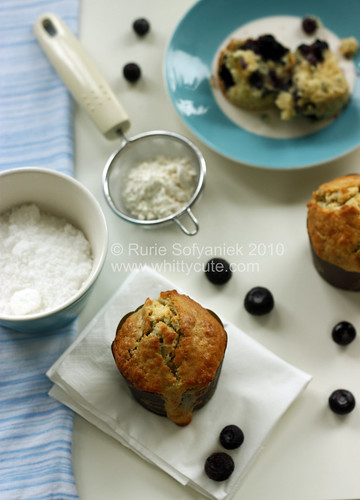
Makes 1 dozen muffins
1. Start the batter
Position a rack in the center of the oven and heat the oven to 350 degree F. Lightly oil (or spray with cooking spray) the top of a standard 12-cup muffin tins (cup should be 2 3/4 inches across and about 1 inch deep) and line with paper or foil baking cups
1 pound (3 1/2 cups) unbleached all-purpose flour
4 teaspoons baking powder
1/2 teaspoon baking soda
1/2 teaspoon table salt
1 1/3 cup granulated sugar
5 ounces (10 tablespoons) unsalted butter, melted and cooled slightly
1 cup whole milk, at room temperature
1 cup creme fraiche or sour cream, at room temperature (I used sour cream while other time I used yoghurt and it worked beautifully)
2 large eggs, at room temperature
1 large egg yolk, at room temperature
In a large mixing bowl, sift together the flour, baking powder, baking soda, and salt; mix well. In a medium mixing bowl, whisk together the sugar, butter, milk, creme fraiche or sour cream, eggs, and egg yolk until well combined.
Pour the wet ingredients into the dry, and fold gently with a rubber spatula just until the dry ingredients are mostly moistened (the batter will be lumpy)—there should still be quite a few streaks of dry flour.
2. Add your choice of flavorings, fruits, chocolate, and nuts (in my case frozen bluberry, do visit her blog to see other possibilities).
3. Fill the tin and bake the muffins
Use an ice cream scoop if you have one with a “sweeper” in it; otherwise, use two spoons to spoon the batter into the muffin cups, distributing all of the batter evenly. The batter should mound higher than the rim of the cups by about 3/4 inch. Bake until the muffins are golden brown and spring back lightly when you press the middle, 30 to 35 minutes. (The muffin tops will probably meld together.) Let the tin coll on a rack for 15 to 20 minutes.
Source: Eliza Adam

I missed KBB in March with their chiffon cake theme, I was little dissapointed of course since I like chiffon cake and were curious about what’s the rest of the member were going to make etc. But nevertheless I missed it because one reason that I couldn’t avoid.
So this month I’m back with this pie, in the “love letter” it said we could use any kinds of pie recipe as long as it was savoury pie with lattice. I googled here and there for a pie recipe that we could also eat for dinner and not to mention easy to make. Other good thing was that we could use shop bought puff pastry. What a relief, since the house is a mess now with moving (yes we are going to move), boxes everywhere, I couldn’t bear my mind to makehomemade puff pastry, tough I never made it before and really would like to try. But better this way than no pie at all right?
All in all this pie was easy to make, was very tasty. And believe me lattice was not as difficult as I thought it would be. So you should try making one too.
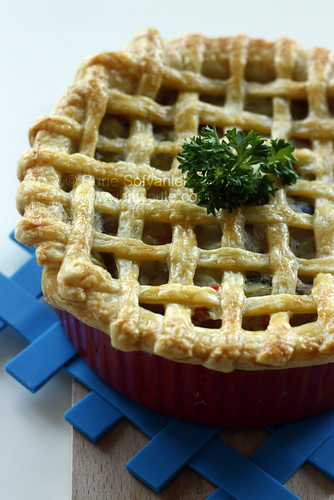
Ingredients:
– 3 boneless chicken breast
– 3 carrots, cubed
– 3 potatoes, cubed
– 3 Asian celery stalks, chopped
– 2 tsp fresh thyme or 1 tsp dried
– 50 ml butter
– 1 onions, chopped
– 3 garlic, minced
– 50 gr plain flour
– 300 ml milk
– Juice of 1 lemon
– 2 tbsp chopped parsley
– 200 gr champignon mushroom, cubed
– 500 gr puff pastry
– 1 egg beaten
– Salt
– Pepper
– Water
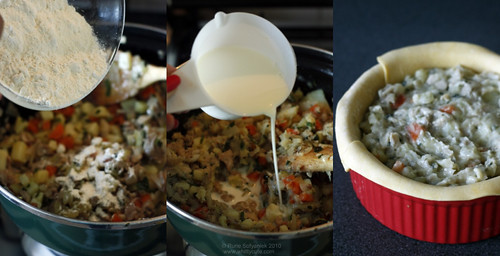
Directions:
– Combine water, chicken, carrots, potatoes, Asian celery, half the thyme in a pan, bring to boil, season with salt and pepper. Reduce heat, cook gently for 15 minutes.
– Set a colander over a large bowl, pour in the pan contents and remove thyme. Remove chicken, cubed it. Reserve 850ml of broth.
– Melt butter in a pan, cook the garlic and onion until soft, about 5 minutes. Add the boiled vegetables, chicken and mushroom. Stir in the flour then the reserved stock a little at a time to make a smooth thick sauce.
– Add the milk and simmer for 2 minutes. Off the heat, stirin the remaining thyme, lemon juice and parsley. Season with salt and pepper.
– Grease 2 oven proof dish/pie dish with butter. Roll out the puff pastry and line the dish. Pour the chicken sauce. Weave the lattice cover. Press the side of the pie with fork and brush the surface with beaten egg. Bake in preheated oven 200C for 25-30 minutes until golden.
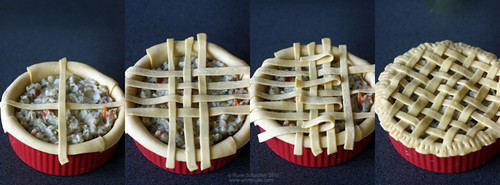
– I looked up here for how to make easy lattice cover.
Recipe adapted from BBCGoodFood
![masakbareng[1]](../../wp-content/uploads/masakbareng1-150x150.png)
In our home, we always stock on eggs. It’s cheap yet it can make such satisfying meal, plus it’s full of nutrition. So there I rest my case. Wondering maybe those are also the reasons why we voted on eggs this month.
For so many years I struggled to make the right tasting balado, I know it’s such a simple dish but somehow for me it was not easy to master. One day it would be too dry, other day it would be just plain BAH. Until one day sometime last year my parent showed me how to make it the right way. I also made sure again by smsing my mother prior to the making of this one. You might laugh now on how much effort I have made for such a simple dish >.<
In a way this dish also reminds me of my father who was a great home cook. Bapak, I hope you rest in peace over there. We surely miss you and your cooking.
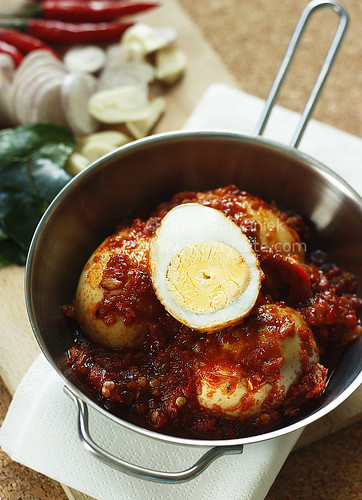
Ingredients
– 10 hard boiled eggs, slit in some parts then fried until it formed brown skin
– 7 red chili (depending on your taste buds)
– 5 shallots
– 3 garlic
– 2 bird’s eye chili (depending on your taste buds)
– 4 kaffir lime leaves, remove the centre part
– 1/2 tsp salt
– 1 tsp sugar
– 2 tbsp vegetable oil
– Around 100ml of water
Directions:
– Pound spices until smooth except salt, sugar and kaffir lime leaves.
– Heat the oil, add spices, salt, sugar and kaffir lime leaves, continue stirring until the spices is done.
– Adjust the taste according to your liking, put the fire lower.
– Add the water into the spices, let it boil, add fried boiled eggs.
– Serve with steamed white rice.
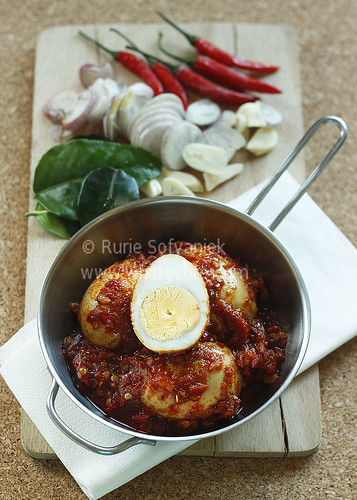
Source: My parents
PS: for all of you Indonesian out there who would like to join our monthly event MasBar, do click here for more information.
|
Awards
 My First Award, Thank You!
Whittycute Foodie Event
 Click here to see the round up!
|


![masakbareng[1]](../../wp-content/uploads/masakbareng13.png)


![masakbareng[1]](../../wp-content/uploads/masakbareng12.png)


![masakbareng[1]](../../wp-content/uploads/masakbareng11.png)


![masakbareng[1]](../../wp-content/uploads/masakbareng1-150x150.png)


