|
|
In Indonesia we eat if possible rice 3 times ^_^ White rice, Fried rice or rice in other form like this dish rice cake with vegetable. And this one is a famous dish for breakfast. I know, westerner think that it’s too heavy to eat this first thing in the morning but not for us. Back home, I could easily buy this in the market but here I have to make it myself
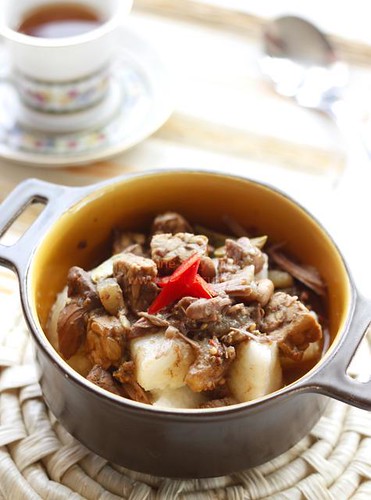
For 4 – 5 persons
Ingredients:
For the rice cake:
– 2 packages of instant rice cake in a bag (or use your own method of making rice cake)
– Boil rica cake in lots of water for approximately 2 hours, drained.
– Cool it down in a colander.
– It’s better to make rice cake the day before because it needs to cool down for some time.
For the vegetable:
– 1 cayote, peeled and sliced into matchsticks
– 1 canned or 300gr fresh young jack fruit, cut into bite size pieces
– 1/2 block of tempe, diced and fried
– 1/2 block tofu, diced and fried
For the spice paste:
– 12 pcs shallots
– 6 pcs garlic
– 3 red chilies (more or less depending on personal taste buds)
– 2 bird’s eye chili (more or less depending on personal taste buds)
– 2 cm galangal bruised
– 3 pcs salam leaves
– 1 tsp salt
– 1/2 tsp dried shrimp paste
– 1/2 tsp sugar
– 2 tsp dried shrimp (ebi) fried
– 200 ml thick coconut milk
– 1 ltr water (more or less depends on how thick or thin you want the end result)
– some oil for stir frying
Directions:
– Grind shallots, garlic, chilies, salt, dried shrimp paste, sugar, dried shrimp into a paste.
– Fry spice paste until fragrant, add galangal and salam leaves.
– Add water and coconut milk, wait until it boils.
– Add young jack fruit then after five minutes add chayote.
– After the vegetable is soft add fried tofu and tempe.
– Stir now and then and cook until it’s all done.
– It’s even better to eat the next day of cooking.
– Cut rice cake into bite size pieces, top up with the vegetable and serve with krupuk and sambal.
Source: My mother
I never knew or heard about this kind of seafood until recently I was hooked into a tv programmed called Hell’s Kitchen. They always had this in one of their menu so I was intriqued to find out and see what made scallops so special until it deserved to be a dish in a fine dining restaurant.But oh boy they are so darn expensive :s but that didn’t stop me from buying them, to satisfy my curiosity, oh was that the risk you had to take as a foodie. But I thought it was money well spent as I never quite eaten anything like scallops, it’s tender meat, juicy and sweet. Here is a simple recipe that worked really well to preserve the delicate taste of scallops.

For 2-3 persons
Ingredients:
– 6 fresh scallops
– 2 garlic cloves
– 100 gr butter
– Handful parsley
– Splash tabasco
– 6 tbs white wine
– 6 tbs olive oil
– Salt
– 6 tbs fine breadcrumbs
Directions:
– Heat the oven to 220C.
– Make the garlic butter. Place, garlic, parsley and butter in a food processor with the splash of tabasco and blitz until zmooth.
– Place the scallop in each shell, keeping the roe on. Splash each one with 1 tbs white wine to each scallop and 1 tbs olive oil.
– Season with a little salt, then place a tsp garlic butter on top of each scallop.
– Sprinkle breadcrumbs on the top of each scallop.
– Place the scallops in a roasting dish and cook in the oven for 5 minutes. The breadcrumbs should be nicely browned, the scallops firmed up and the olive oil, garlic butter and white wine all bubbling together.
– Serve 3 scallops to a plate or one plate of 6 to share and get tuck in.
Adapted from the book: Fish: the Complete Fish & Seafood Companion by Mitch Tonks
I couldn’t help but drool when I saw this cheesecake from this pretty pregnant lady ^_* I thought, I have to make it, have to, no excuse! That’s the thing of being foodie blogger, everyday you see food posts from your foodie blogger friends and you drool in front of your screen uncontrollably. I bet this happens to all of us foodie blogger.
Back to the cheesecake, I read somewhere but I forgot where, that if you baked cheesecake with au-bain marie technique it will lighten the texture. I did so with my cheesecake, it tasted perfect but as I never tasted cheesecake baked without au-bain marie technique before so I didn’t know the differences between those two.
I didn’t know whether it was my own fault or what but I ended up needing twice ingredients for the cheesecake base. First I did just like the recipe said, but it covered only half of my baking tin. Was it because I was using a 20cm round baking pan and not the square one as the recipe suggested? I also made orange lemon instead of cherry. I didn’t have cherry at the time and I love orange lemon a lot so I thought why not? But the rest I followed the recipe and Dita’s suggestions. It tasted so good, creamy yet fresh with a tang from the orange lemon, definitely a keeper.
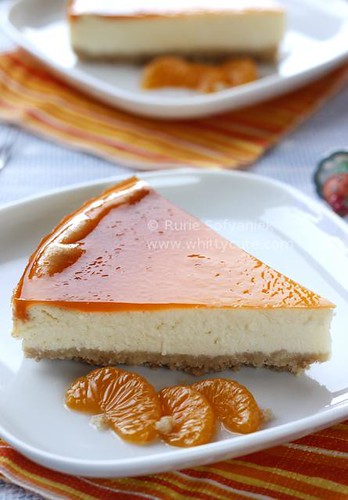
Ingredients:
– 6 Honey Maid Honey Grahams, crushed (about 1 cup) (I used regular biscuit marie but I ended up using 2 cups)
– 3 tbs sugar (I used 6 tbs)
– 3 tbs butter or margarine, melted (I used 6 tbs)
– 5 pkg (8 oz. each) Philadephia Cream Cheese, softened (I used 2 pkg = 370gr)
– 1 tbs vanilla (I used 1 tsp)
– 4 eggs
– 1.5 tsp lemon zest
– 2 tbs lemon juice
– 1 can mandarine orange
Directions:
– Heat oven to 325°F (160C).
– Mix crumbs, sugar and butter; press onto bottom of 13×9-inch pan. Bake 10 min.
– Meanwhile beat cream cheese, 1 cup sugar, flour, lemon zest, lemon juice and vanilla with mixer until well blended. Add sour cream; mix well. Add eggs, 1 at a time, mixing on low speed after each just until blended. Pour over crust.
– Bake 40 min. or until center is almost set. (Mine was 1 hour) Cool completely. Top with orange glaze. Refrigerate 4 hours.
– Serve with mandarine orange on the side.
Orange glaze:– 150 ml orange juice – 2 sheets gelatine
– Melt gelatine according to the package.
– Mix well with orange juice.
– Pour over baked cheese cake and refrigerate.
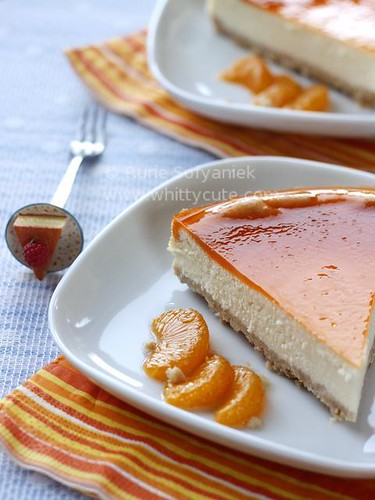
Source: Philadelphia through Dita
I love love this dish, but then again….it’s darn expensive to buy seafood in Holland so I couldn’t eat this as much as I have liked 😀 So when I got the chance, I would really enjoy it until the last bite.

For 2-3 persons
Ingredients:
– 300 gr shrimps, deveined
– 4 tbs butter
– 5 garlic, minced
– 2 spring onion, sliced
– 5 tbs kecap manis (Indonesian sweet soy sauce)
– 5 tbs worchestershire sauce
– Salt
– Pepper
– 4 tbs lime juice
– 2 tbs vegetable oil
Directions:
– Marinade shrimps in in 2 tbs lime juice for 15 minutes, then wash until clean.
– Heat oil in shallow pan, stir shrimps until it turns color, set aside.
– Heat butter in the same pan, add garlic, stir until garlic turns color and fragrant.
– Add fried shrimp, add kecap manis, worchestershire sauce, salt and pepper.
– Add spring onion, stir throughly and take out from the fire.
– Pour the lime juice over shrimps before serving.
Source: My mother
I first ate this at friend’s of masbul, Ron and Marie-Anne. They would invite us for dinner from time to time and her dishes were always wonderful. I thought this was a nice dish which look classy yet so easy to make.

Ingredients:
– 1 pack ready made puff pastry
– 1 can salmon in water, drained
– 1 tub garlic soft cheese (I used boursin)
– Freshly ground black pepper
– Parsley (optional)
– 1 egg yolk, lightly whisk
Directions:
– Preheat oven to 200C and thaw the puff pastry.
– Rolled out puff pastry and filled with a tbs garlic cheese and salmon.
– Sprinkle generously with black pepper and parsley.
– Shape the puff pastry as you like and brush the surface with egg yolk.
– Bake in the oven according to the puff pastry direction or until golden brown (mine was 20 minutes)
Source: Marie-Anne
In Holland, when it’s your birthday then you have to do “trakteren” (traktir in Indonesian 😉 or treat in English) your colleagues at work. Usually the birthday boy/girl would bring cakes as a form of “trakteren”. But because last Friday was masbul birthday but that day he wasn’t at work since it was “harpitnas” (Thursday April 30th was Queen’s Day), so tomorrow he is going to bring cakes.
I decided to make my own cakes and to proof that I am crazy I decided to make 4 kinds of cakes :p , no not alone, I’m not that crazy. I baked with my friend Iin the whole Sunday afternoon. It’s so much fun to bake with company as you can share jokes, update about our life and of course gossip :p Thank you In for helping me with all the cakes 😉
The 4 kinds of cakes were; Kue Soes Isi Vla, Carrot Pineapple Cake, Mini Fruit Pie and Brownies. I have made the kue soes isi vla and carrot pineapple cake before so you could follow the link to find out the recipes. As for the mini fruit pie, I cheated on the most important part which was the pastry :p I bought ready made pasrty shell then filled it with Napoleon Vla, topped it with fruit and glazed it with clear jelly.

But what I’m going to share with you is this amazing brownies…..it was just so heavenly good. The top was nicely dry and cracked like rice field in the dry summer months. The inside was nicely fudgy, chocolatey and gooey just like a proper brownies should be. I got the recipe in one of my recipe book collection. Bake by Rachel Allen, a famous chef from UK.
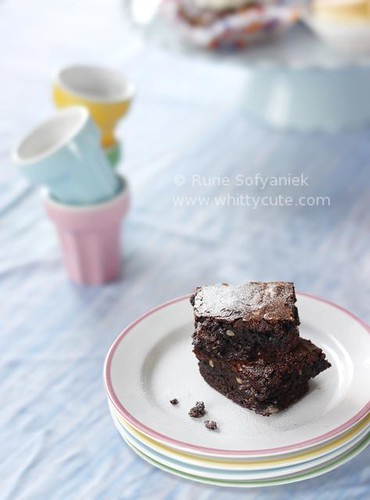
Makes 16 pieces
Ingredients:
– 175 gr dark cooking chocolate (use best quality you can afford as this will determined the taste of your brownies)
– 175 gr butter
– 25 gr good quality cocoa powder
– 3 eggs
– 225 gr caster or soft brown sugar (I used 175 gr)
– 1 tsp vanilla extract
– 100 gr plain flour
– 75 gr hazelnut, toasted skinned and roughly chopped
– Icing sugar and cocoa powder for dusting (optional)
Directions:
– Preheat oven to 180Celcius. Line the base and sides of a cake tin (20x20cm) with baking paper.
– Melt the chocolate, butter and cocoa powder together in a heatproof bowl set over a saucepan of simmering water. Do not lete the base of the bowl touch the water. Remove from the heat. (I did this part in the microwave 😉 )
– In a separate bowl, whisk the eggs, sugar and vanilla extract for 2 minutes. Continuing to whisk, add the chocolate mixture until well combined. Sift in the flour through with the hazelnuts with a spatula or metal spoon.
– Spoon the mixture into the prepared tin and bake in the oven for 19-25 minutes. Allow to cool in the tin, then cut into squares.
– Dust with icing sugar and cocoa powder (optional)
Source: Bake by Rachel Allen
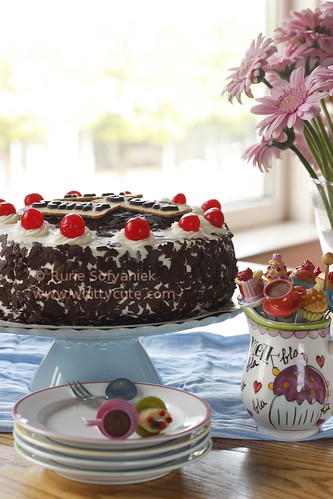
I made this cake for masbul’s B’day today. But I was feeling rather experimental (or lazy) so I didn’t make my own sponge cake as usual, but I was using ready made sponge cake mix. I was sceptical with that product at first but the result turned out to be nice, soft and moist sponge cake, bouncy and not too sweet.
For the rest of the decorations, I just used what I had in hand. Cherry with stem was not available so I just make do with cherry without stem. Then I used ready made chocolate curls which I had difficulty in sticking them onto the cake. Tried to sprinkle it by just throwing it on the side surface, but more chocolate curls on the floor than on the cake. Tried to stick it to my hand then transfer it onto the cake, but then some of the whip cream would stick on my hand. Anyone has better idea on how to do it easily? On the other hand what nice was the cherry filling, I didn’t have to thicken it myself because here they’ve got cherry pie filling in the can 🙂
Gefeliciteerd met jou verjaardag schatie 🙂

For 12 persons
Ingredients:
Sponge cake
– 1 ready made chocolate sponge cake mix (I used PrimaMix or used your own favorite chocolate sponge cake recipe)
– Prepare sponge cake according to the package
Simple syrup
– 100ml cherry water or water
– 50gr sugar (usually it’s 1:1 scale of water and sugar but I don’t really like it too sweet)
– 50ml rhum (optional)
– Boil cherry water or water with sugar.
– Let it cool down then add rhum
Whip cream
– 750 ml fresh cream
– 4 tbs sugar
– Put the whisk and bowl for whipping the cream in the freezer for 30 minutes or more.
– Whisk the cream for 2 minutes then add sugar, continue whisking until hard peak.
Other ingredients
– 300 gr chocolate curls
– 12 Maraschino cherry
– 1 can cherry pie filling
Finishing:
– Divide cake into 3 parts and sprinkle with simple syrup.
– Spread thick layer of whipping cream on the lowest part of the cake, add 1/2 can of the cherry pie filling, top with the second part of the cake.
– Repeat process one more time.
– Spread remaining whipped cream on the surface of the cake, reserved a little bit of whipped cream enough for the swirls on top.
– Decorate with chocolate curls and Maraschino cherry.
– Chill until served.
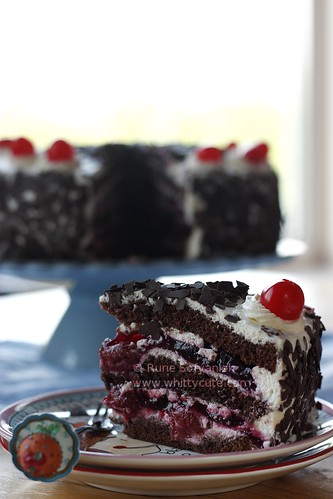
Got no exact source for this as I’ve been making this over the years and adjust ingredients here and there according to my taste and what’s available but as you all know this cake came from Germany 😉
Maybe some people don’t really understand how much effort we as foodie blogger make to produce one single post with a recipe and photo(s). For example for making this post with two pictures, there are several steps that I had to go through:1. Deciding what to cook.2. When decided then thinking whether I have the recipe or not.3. Calling my mother in Indonesia for the recipe (calling cost money).4. Modifying the recipe to what is available in the place where I live.5. Shopping for the ingredients (if I want to make authentic Indonesian food I have to prepare extra cost since I live abroad and prices of authentic Indonesian ingredients are not that cheap).6. Preparation of cooking.7. Cooking; while food is being cooked I would think about how I wanted the picture to look like, what composition is nice etc.8. Pre photo session; trying to find where the good light source is, drag the table top to where the light source, taking out the photo properties ie; plates, flower, placemats (the properties also don’t come for free) and arrange the setting.9. Photo shoot (with camera which I know is not cheap) which usually ended with lots of pictures but only 1 or 2 are presentable.10. Cleaning up the mess I made, washing up.11. Photo editing (I’m not really good at this part so this could easily take some time).12. Photo uploading to Flickr (which is btw not for free).13. Translating recipe into English.14. Typing recipe and post.
All of those steps are not instantly done in a minute and then you get a photo and a recipe. They cost time, energy and money. We produce every post with lots of thought, love and passion for food and food photography. Which later we share the result in our food blog. But that doesn’t mean anyone can just grab it anytime they please without saying anything esp. not for commercial purposes.
Maybe I do sound harsh and cynical, but I do feel the anger of my fellow foodie blogger who got rob by some so-called book publisher in Indonesia; Cam Boga and Pustaka Anggrek. The publisher deliberately took their pictures (and some also with the recipe) without permission and publish it in a commercial recipe book. For more info about the issue please do click Budi Sutomo, SLF MP, Vivi Liong, Arfi Binsted.
And please do not buy copy paste book!!!!!
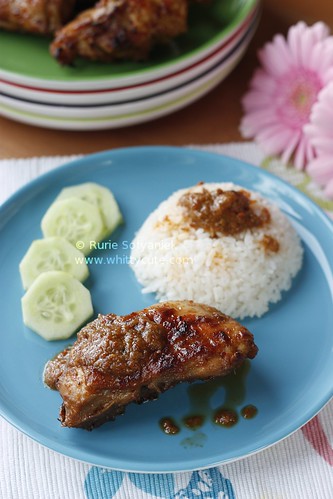
For 4-5 persons
Ingredients:
– 500gr chicken pieces
– 3 salam leaves
– 2 lemongrass bruised
– 200 ml thick coconut milk
– 1/2 tsp tamarind dissolve in a little water
– Water
For the spice paste:
– 3 red chili (less or more depending on your taste buds)
– 3 bird’s eye chili (less or more depending on your taste buds)
– 6 shallots
– 3 garlic
– 4 candlenuts (I used 3 tsp instant candlenut in jar)
– 2 cm ginger
– 1/2 tsp tamarind
– 1/2 tsp palm sugar
– 1 tsp salt
Directions:
– Rub chicken pieces with tamarind water and set asi
de for 10-15 minutes then rinse.
– Pound all the spice paste ingredients until smooth.
– Heat a little bit of oil in a pan, when it’s hot fry spice paste, salam leaves and lemongrass. Continue stirring until fragrant.
– Add chicken, stir until chicken turns color.
– Add coconut milk and some water just enough so the chicken sink, lower the fire and continue cooking until the sauce has thicken and chicken is done.
– Grilled chicken in a grill (or alternatively you could do it in an oven), brush now and then with the remaining sauce. Grill until both sides are nicely brown.
– Serve with steaming white rice, remaining sauce and raw vegetable; cucumber, sweet basil, cabbage (optional).
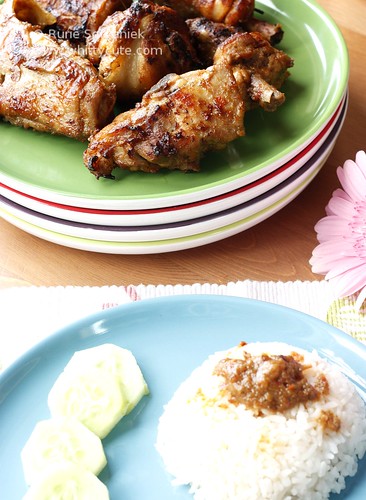
And yes my pictures are not that good but they are mine so from now on I also put my watermark in the middle and not in the bottom anymore.
Source of recipe: My mother
 Finally I could participate in this month’s masbar with it’s special theme “Indonesian Traditional Dessert with Rice Ingredients”. You could choose to use whatever rice there is; rice flour, glutinous rice, glutinous rice flour etc. The choices are endless. Finally I could participate in this month’s masbar with it’s special theme “Indonesian Traditional Dessert with Rice Ingredients”. You could choose to use whatever rice there is; rice flour, glutinous rice, glutinous rice flour etc. The choices are endless.
I wanted to make the real Putu Mayang but 🙁 I didn’t have the mould. But they say there are many ways to go to Rome so I just made it without the mold, and it still tasted good 🙂
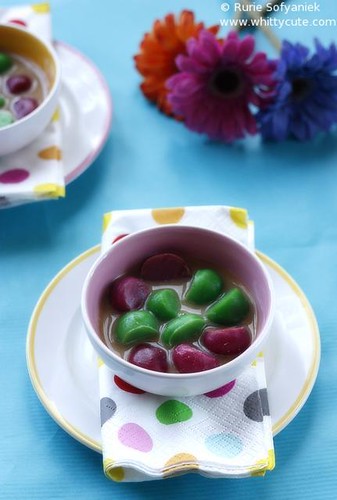
Ingredients:
– 250 grams rice flour
– 550 cc boiling water
– 1-2 teaspoons salt
– Red and green food dyes
Coconut Milk Sauce:
– 500 cc coconut milk from 1 coconut
– 200 grams brown sugar, finely sliced
– ¼ teaspoon salt
– 2 pandan leaves
Directions:
– Line basket for steaming with a clean napkin, put in the dry rice flour, steam for about 1 hour and set aside
– Pour boiling water on the rice flour, add salt and stir well. Allow to cool, then knead to a fine texture. Divide the dough into 3 parts: one part to be dyed red, the second green and the third remain white.
– Put the dough in the Putu Mayang mould and press into the form desired. Serve with coconut milk sauce
– Coconut milk sauce: place all ingredients in a saucepan and bring to a boil, stirring constantly.
Source: Book Kue Kue Indonesia by Yasa Boga
A really humble dish from my mother’s hometown in Blitar. It is usually sold in pair with Pecel Punten. A dish that I would always buy or beg my aunt to make when I go there. A sort of comfort food if you may say.But weirdly since I live here I could cook dishes I never imagine I could cook by myself not even in a million years 😀 now that is a good side of living 12.000km away from home. Life is not that bad right 😉 You just have to make the most of it.Back to my dish, I enjoyed it while sitting in my balcony, the sun was shining, the wind was caressing me gently. I closed my eyes and just imagined sitting in the kitchen of my aunt’s house back in Blitar.
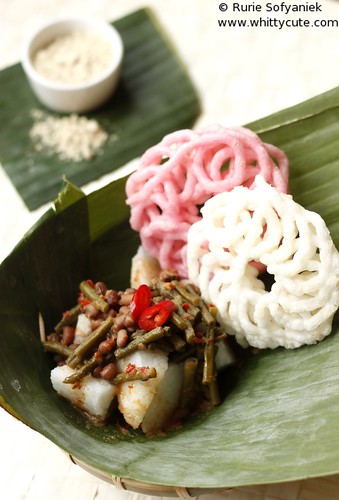
For 4-5 people
Rice Cake
Ingredients:
– I used 1 instant rice cake in plastic sachet but of course you are free to use your own method of making rice cake.
– 1 tsp kapur sirih (lime stone) dissolved in a little bowl of water
Directions:
– Boil rice cake in lots of water along with the lime stone water for 2 hours until rice cake is done.
– Cooled rice cake in a colander.
Sayur Lodeh
Ingredients:
– 200 gr Kacang Merah, soaked overnight (adzuki beans, haricot rouge, red bean, Vigna angularis) In Indonesia we usually use kacang tolo (Vigna unguiculata) but I couldn’t find that but the red bean tasted just as nice.
– 200 gr long beans, cut 2 cm long
– 12pcs shallots
– 6pcs garlic
– 3 red chilies (more or less depending on personal taste buds)
– 2 bird’s eye chili (more or less depending on personal taste buds)
– 2 cm galangal bruised
– 3 pcs salam leaves
– 1 tsp salt
– 1/2 tsp dried shrimp paste
– 1/2 tsp sugar
– 2 tsp dried shrimp (ebi) fried
– 200 ml thick coconut milk
– 1 ltr water (more or less depends on how thick or thin you want the end result)
– some oil for stir frying
Directions;
– Grind shallots, garlic, chilies, salt, dried shrimp paste, sugar, dried shrimp into a paste.
– Fry spice paste until fragrant, add galangal and salam leaves.
– Add water and coconut milk, wait until it boils.
– Add kacang merah then after five minutes add long beans.
– After the vegetable is soft add fried tofu.
– Stir now and then and cook until it’s all done.
– It’s even better to eat the next day of cooking.
Feel free to mix and match vegetable of your choice ie; jackfruit, labu siam (chayote), bamboo shoot.
Bubuk Kedelai (Soy Bean Powder)
Ingredients:
– 200 gr soy bean, soaked for 1-2 hours
– 2 clove garlic, sliced and deep fried
– 2 kaffir lime leaves
– 2 cm lesser galangal
– 1 tsp salt
Directions:
– Panbroil soy bean, kaffir lime leaves, lesser galangal until dry and soy bean is done.
– Grind in a food processor until smooth, add fried garlic and salt.
– Sieve with a colander to get a smoother result.
Finishing
– Cut rice cake into bite size pieces, top with vegetable.
– Sprinkle with soy beans powder.
– Serve with krupuk kampung (optional)
Source: My mother
|
Awards
 My First Award, Thank You!
Whittycute Foodie Event
 Click here to see the round up!
|


