|
|

Maap ye penonton (huh kayak ada yg nonton aja bu..ga usah GR) postingannya kue fondant lagi. Mumpung aye masih semangat belajar oi 🙂 The fondant topper weren’t perfect yet but at least I practiced a thing or two. Para suhu mohon bimbingannya ya.

These cupcakes I made for one of my friend. She has just given birth to a handsome baby boy named Leandro. Gefeliciteerd met de baby ja 😀
My inspirations: Yulia, Titi, Thata, Wilton Celebrate with Fondant Book, Wilton Cupcake Fun

I was craving badly, I mean really badly for kue lapis Surabaya. I missed the moist soft texture of the cake, the everything….I’m speechless. But one thing that made me wouldn’t make my own cake was the baking pan. Original recipe called for 3 square baking pan, then you assembled the cake to make the layer. Not that I didn’t want to buy a square pan but they cost each at least 10E here…sigh..But since I couldn’t handle my craving anymore I had to find a way to make it with only one pan.
I came accross Ning Rachmah site and found a yummy looking Kue Lapis Surabaya. And as she is a real cake seller (not like me 😛 ) I completely trusted her recipe. But wait what to do since I had only 1 pan. After thinking hard for 2 days, no just kidding :p I decided to make the recipe 2/3 then cut it in half to make the layer.
Then what was that with the fondant cover? Was I trying to do something silly like humiliating myself with cake decorating which I know I couldn’t do well. I’ve always wanted to learn fondant but haven’t got the time (sok sibuk) but now since I got nothing to do I could have time to learn a thing or two about fondant. Ooh there’s a silver lining after all for being jobless :p Oh and to make my learning process goes smoothly (not that I ‘m a fast learner either 😛 ) I also joined Creative with Fondant, a forum founded by Indonesians real tukang kue 😀
There’s not much I can’t tell you about the fondant. I made it with just rolling pin and Wilton cookie cutter. I also bought ready made rolled fondant but there was no purple color. Since I wanted to participate also in MFM2 and this month’s theme was Nuansa Ungu, I had to color my own fondant with Wilton icing color. And you could see my amateur hand, the purple color was not spread evenly!!! Oh…
2/3 recipe
Ingredients:
– 20 egg yolk (yes you read it right I didn’t type it wrong)
– 4 egg white
– 160 gr sugar
– 10 gr emulsifier
– 110 flour
– 30 gr coffee creamer
– 15 gr cornstarch
– 200 gr butter melted
– 1 tsp vanilla essence
– Blueberry jam
Directions:
– Beat the egg and sugar on high speed with electric mixer until sugar has dissolved. Add emulsifier, beat shortly, slow the speed add dry ingredients, turn the speed high again. Continue beating until batter is thick.
– Turn off the mixer, add melted butter, mix well. Add vanilla essence and mix well.
– Pour batter in a greased and floured 24cm square baking pan. Bake in 160C oven for 35-40min or until toothpick inserted to the cake come clean.
– When the cake is done, take the cake out from the baking pan, cool in a cooling rack.
– When it’s cold, divide cake into two and spread blueberry jam on both sides of the cake. Stick them together again to make layer. Carve the outside part of the cake as needed.
Source: Rachmah Setyawati

I didn’t make this specially for Valentine’s tomorrow but since it’s tomorrow’s event so why not. I actually made this to practice again about cake making. This was just a simple sponge cake with buttercream and fruit. And actually it was a “nekat” project since I didn’t have lazy susan nor spatula. I used the cake stand as lazy susan and big long knife as spatula.
After asking here and there about good sponge cake recipe I followed Rita’s advice by using Yongki Gunawan’s sponge cake recipe, because she said it’s the best and she was so right. The sponge cake was soft, bouncy, light just everything I wanted from a sponge cake. Then came the buttercream…tricky part number one was that people here don’t really like the taste of buttercream, they only like whipped cream but whipped cream is difficult to work with. Number two there’s no shortening sold here eventhough I did find one (in one and only TBK) in Rotterdam (or possibly Holland). But it was imported from USA therefore it was so expensive 5E/can 🙁 Then there’s also ready made buttercream frosting with nice taste but again it was from USA and also 5E/can. It was Duncan Hynes brand and the bules liked the tasted of that thing (I tried frosting with this before) What should I do then to make a nice tasting buttercream but still stiff enough to work with? Just keep on reading.

Yongki Gunawan’s Sponge Cake
(This is half recipe only)
Ingredients:
– 5 egg yolk
– 2.5 egg white
– 5 gr emulsifier (I used TBM)
– 75gr sugar
– 50gr cake flour shifted
– 1/2 tbs powdered milk (I omitted this)
– 1/2 tbs cornstarch
– 75gr butter
– 1/2 tbs condensed milk (I omitted this)
Directions:
– Preheat oven to 180C, grease and flour a round or square cake tin.
– Melt butter in a saucepan.
– Whisk eggs, sugar, emulsifier, flour, cornstarch until thick, white and fluffy. (Only do this if your electric mixer is strong enough. If not then first whisk eggs and sugar until just thick add emulsifier continue whisking until it’s thick, white and fluffy. Add flour, cornstarch, powdered milk).
– Add butter and mix well.
– Pour in the cake tin and bake for 25-30 minutes or until a tooth pick inserted comes out clean.
Simple syrup:
– 1/4 cup water
– 1/4 sugar
– Some drops rum (if you like)
– Mix water and sugar in a saucepan, heat in a low fire while keep stirring it.
– When it’s just bubbling take it from the fire.
– Add rum.
Buttercream:
– 150gr unsalted margarine
– 50gr unsalted butter
– 2 cups confectioner sugar
– 100ml low fat cream (verse geslagen room)
– 1 tsp vanilla extract
– 1 tsp rum (if you like)
– Some drops Wilton white white icing colors
– Whisk everything in a electric mixer until fluffy and light (mine was 30 minutes or so).
Fruit:
– 1 can mandarin orange
– 100gr strawberry
– 1 kiwi
– 100gr raspberry
– Drain mandarin orange.
– Clean strawberry and cut into 4.
– Peel kiwi and sliced.
– Wash raspberry.
Garnish:
– Toasted almond slices
Finishing:
– Divide sponge cake into two parts.
– Brush each side with simple syrup, reserve a little bit of syrup for the top
part of the cake.
– Spread some buttercream on both sides of the cake.
– Arrange 1/3 fruits in the middle cake.
– Lift the top part and close the cake.
– Brush the top part cake with the rest of the simple syrup.
– Spread buttercream all over the cake’s surface, reserve some for decoration.
– Using pastry bag and decorating tips, decorate the outer top of the cake. I used Wilton 1M and made stars (boy it was 1AM and my mind was stuck :P)
– Arrange fruits on top and almond slices on the side of the cake.
Sponge Cake Source: Yongki Gunawan
Others: Me
I dedicated this cake to all of my friends out there, you know who you are 🙂 Happy Valentine’s Day!
PS: Don’t forget to participate in my foodie event 😀

I bought a package of strawberry for 1 euro at the market which meant that it was dirt cheap knowing now it’s not yet the season for strawberry. So I decided to make something out of it. Where else to look for cupcake/muffin recipe but Vania’s blog. Everyone knows she is the queen of cupcake/muffin 😉
Anyhow the end result of the cupcake was a bit too dense for my taste buds just as described by some reviewers at the Martha Stewart’s website. Was it my fault or what 🙁 but thank God the nice icing made it up, I used ready made vanilla icing by Duncan Hynes plus some pureed strawberry and it tasted nice like ice cream.
Ingredients:
– 2/3 cup whole fresh or frozen strawberries, thawed
– 1 1/2 cups all-purpose flour, sifted
– 1 teaspoon baking powder
– 1/4 teaspoon coarse salt
– 1/4 cup whole milk, room temperature
– 1 teaspoon pure vanilla extract
– 1/2 cup (1 stick) unsalted butter, room temperature
– 1 cup sugar
– 1 large egg, room temperature
– 2 large egg whites, room temperature
Directions:
– Preheat oven to 350 degrees. Line a 12-cup muffin tin with cupcake liners; set aside.
– Place strawberries in a small food processor; process until pureed. You should have about 1/3 cup of puree, add a few more strawberries if necessary or save any extra puree for frosting; set aside.
– In a medium bowl, whisk together flour, baking powder, and salt; set aside. In a small bowl, mix together milk, vanilla, and strawberry puree; set aside.
– In the bowl of an electric mixer fitted with the paddle attachment, cream butter on medium-high speed, until light and fluffy. Gradually add sugar and continue to beat until well combined and fluffy. Reduce the mixer speed to medium and slowly add egg and egg whites until just blended.
– With the mixer on low, slowly add half the flour mixture; mix until just blended. Add the milk mixture; mix until just blended. Slowly add remaining flour mixture, scraping down sides of the bowl with a spatula, as necessary, until just blended.
– Divide batter evenly among prepared muffin cups. Transfer muffin tin to oven and bake until tops are just dry to the touch, 22 to 25 minutes. Transfer muffin tin to a wire rack and let cupcakes cool completely in tin before icing.
Source: Martha Stewart through Vania
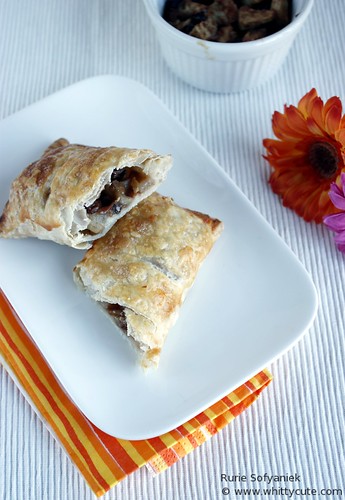
I made this after drooling over Rita’s Apple Strudel, but I didn’t make my own pastry like she did 😀 Hmmm enak…….

Ingredients:
– Pastry dough
– 1 egg
– 1 tbs water
– 2 tbs granulated sugar
– 1 tbs all-purpose flour
– 1/4 tsp ground cinnamon
– 2 large Granny Smith apples, peeled, cored and thinly sliced
– 2 tbs raisins
– Confectioners’ sugar (optional)
Directions:
– Thaw the pastry sheet at room temperature for 40 minutes or until it’s easy to handle. Heat the oven to 180C. Lightly grease a baking sheet. Beat the egg and water in a small bowl with a fork.
– Stir the sugar, flour and cinnamon in a medium bowl. Add the apples and raisins and toss to coat.
– Unfold the pastry sheet on a lightly floured surface. Roll the pastry sheet into a 16 x 12-inch rectangle. With the short side facing you, spoon the apple mixture onto the bottom half of the pastry sheet to within 1-inch of the edges. Starting at the short side, roll up like a jelly roll. Tuck the ends under to seal. Place seam-side down on the baking sheet. Brush the pastry with the egg mixture. Cut several 2-inch-long slits 2 inches apart on the top.
– Bake for 35 minutes or until the pastry is golden. Cool on the baking sheet on a wire rack for 30 minutes. Sprinkle with the confectioners’ sugar, if desired.
Tip: Make sure to toss the apples and raisins in Step 2 until they’re evenly coated with the flour mixture. The flour helps to thicken the juices released by the apples as they cook.
Source: Rita’s Blog
The original recipe title was Orange Cranberry Drops but since I omitted the cranberry I thought the same title wouldn’t suit the cookie anymore. The end result was a nice chewy cookie, enjoy it with a cup of tea or coffee.
Ingredients:
– 1/2 cup white sugar
– 1/2 cup brown sugar
– 1/4 cup butter, softened
– 1 egg- 3 tbs orange juice
– 1 tsp grated orange zest
– 1 1/2 cups all purpose flour
– 1/2 tsp baking powder
– 1/2 tsp baking soda
– 1/4 tsp salt
– 1/2 cup chopped dark chocolate
Directions:
– Preheat oven to 375 degrees F(190 degrees C). Lightly grease cookie sheets, or line with parchment paper.
– In a medium bowl, cream together the white sugar, brown sugar, and butter. Stir in the egg, orange juice, orange extract, and orange zest. Sift together the flour, baking powder, baking soda, and salt; mix into the orange mixture. Stir in the dried cranberries. Drop cookie dough by heaping teaspoonfuls, 2 inches apart, on the prepared cookie sheets.
– Bake for 10 to 12 minutes, or until edges are starting to brown. Cool on baking sheets for 5 minutes, then remove to a wire rack to cool completely.
Source: Allrecipes
This one is a traditional Dutch dessert. It’s usually eaten warm or cold with ice cream or a little bit of whipped cream.

Ingredients:
– 1 kg small poaching pears
– 3 cloves
– 1 piece of lemon rind
– 2 cinnamon sticks
– 100gr soft brown sugar
– 200ml red wine
– 100ml orange liqueur
– 1 tbs potato flour or arrowroot flour
– Some water
Directions:
– Peel the pears and leave them whole, with the stem intact.
– Put the pears, lemon rind, cinnamon sticks, cloves and sugar in a large pan.
– Add the red wine and liqueur, add enough water just to cover the pears.
– Cover and bring to boil and simmer for 2.5 hours until the pears are tender.
– Discard the lemon rind and cinnamon sticks, lift the pears carefully out of the pan and arrange in a nice platter.
– In a cup combine the potato flour with a little pear juice and return to the pan, stirring bring to the boil.
– Reduce the heat and simmer to a smooth, thick sauce.
– Pour the sauce over the poached pears.
Source: Adapted from Book “Dutch Cooking Today”

Finally I made this…….ok ok I know Christmas is over but that doesn’t mean you can’t make anymore cookies does it??
These cookies were easy to make just make sure you rest them overnight in the fridge and not just 1-2 hours as I found that 1-2 hours weren’t enough. The dough was still soft and not firm enough. But the next day it was fine, it didn’t stick on the surface or the rolling pin. Just make sure also that you flour the surface and rolling pin 🙂
As for the royal icing, I did as the recipe plus I added 1 tsp vinegar because as I read it somewhere it would make the icing harden faster. And also after finishing with decorating, put the cookies back to the oven in low heat (80C) for some minutes to dry the icing and also to kill the bacteria in the egg whites.
The verdict was this is a definitely a keeper recipe. The cookies weren’t too sweet and the royal icing with it’s sweetness compliment the taste of the cookies. As for the texture they were just as described at the website melt-in-your-mouth delicious…….hmmm one is never enough!!
Source:Sugar Cookies www.allrecipes.com
Royal Icing www.alrecipes.com
It’s snowing outside, so what is better than snuggling in the couch under the blanket with a cup of tea and pisang goreng. Here is my mother version of pisang goreng with egg in the batter. It makes the batter crispier which I really like.

For 2-3 persons
Ingredients:
– 1 ripe pisang tanduk cut as you like
– oil for deep frying
For the batter:
– 1/2 cup self rising flour (if you don’t have it mix normal flour with a pinch of baking powder)
– 1/8 cup maizena
– 1 egg
– 1 sachet vanilla sugar (if you don’t have it use a pinch of vanilla powder)
– 1 tbs caster sugar (if you use vanilla powder add 2 tbs caster sugar)
– pinch salt
– 1/2 cup water
Directions:
– Mix all the batter ingredients in a bowl until smooth.
– Add banana and stir gently until the batter covers the banana nicely.
– Heat up oil in a pan, fry banana until golden brown.
Source: My mother

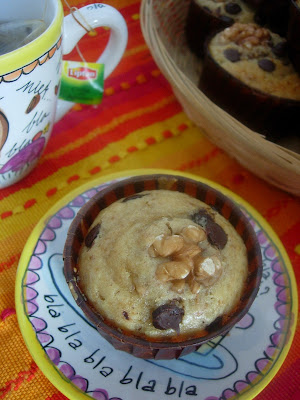
I made this some time ago but always forgot to post it. It was nice peanutty taste and very easy to make. Thanks Vania for sharing the recipe.
Ingredients:
1 1/2 cup all purpose flour
1/2 cup white sugar
2 tsp baking powder
1/2 tsp salt
1/2 cup chunky peanut butter
1/4 cup butter
1 cup milk
2 beaten eggs
some choco chips (me)
some walnuts (me)
1. Mix dry ingredients stir in peanut butter and butter until mixture is crumbly.
2. Add eggs and milk and stir until moistened.
3. Add choco chips and walnut.
4. Pour the mixture in paper muffin case or greased muffin pan
5. Bake 180C for 15-20 minutes.
Source : Vania’s blog
|
Awards
 My First Award, Thank You!
Whittycute Foodie Event
 Click here to see the round up!
|


