|
|
Black forest cake has been one of my favourite cake since forever. I remember when I was small, my adopted American grandmother would some times treat us to a special 5 star hotel bakery. Occasion like that didn’t come often, only came with birthday or special celebration. Back then the tasted resembled nothing I ever had, you could taste chocolate, cherry, sweet rhum all at the same time. Not forgetting the pretty presentation. There we were, in our best clothes at a 5 star hotel surrounded by ‘high class’ baked goods, everything looked nice and classy and we felt very special that day. A sweet memory that I still cherish until now.
Now I am able to make my own I don’t forget about this cake, it is still my favourite and this time I made it specially for Masbar‘s 3rd birthday and my very own blog 4th birthday. Happy birthday to both of us!
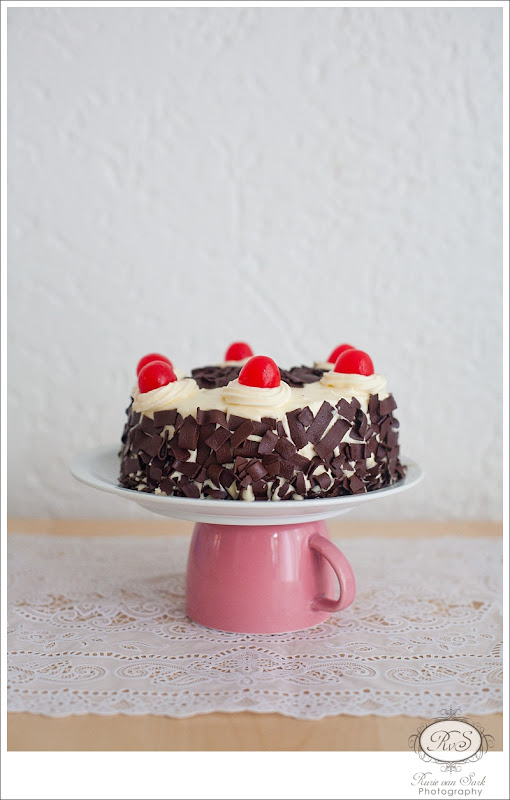
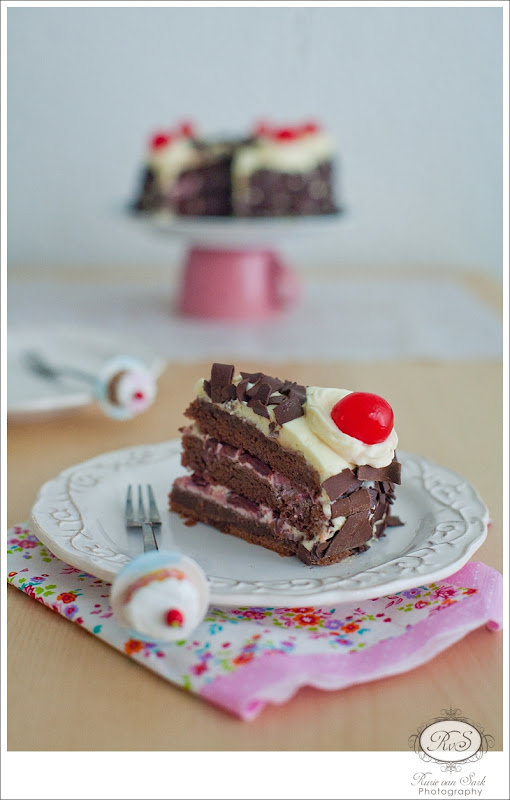
Recipe: do click here.

Nggak terasa waktunya untuk KBB lagi, udah yang ke 24. Wow, eh tapi tanpa event spt KBB rasanya kok ini blog nggak keisi2 ya…duh. Anyway ini baru pertama kali bikin pie, kupikir ngaduk adonan pienya musti manual ternyata nggak juga, bisa pake FP, YAY! Walaupun sesudah diaduk di FP dan didinginkan di kulkas 30 menit kok tetep ambrol adonan kulit pienya. Ya sudahlah tetep bisa dicetak kok. Karena nggak punya cetakan pie aku pakai cetakan pie kertas sekali pakai dan berhasil juga. Filling coklatnya bikinnya gampang, tinggal aduk dan tuang, aku ngovennya juga nggak lama-lama banget supaya fillingnya nggak kering dan tetep basah-basah. Rasa pienya wow legit banget, nyoklat banget, makannya musti sedikit-sedikit loh. All in all senang udah belajar bikin pie. Kalau nggak karena KBB, nggak mungkin deh.

Sumber: Best Food: Desserts. The Australian Women Weekly.
Untuk 10 porsi

Pastry
185g tepung terigu
25g coklat bubuk
55g icing sugar mixture
150g mentega dingin, cincang
2 kuning telur
1 sdt air dingin
Campur tepung, bubuk coklat, gula dan mentega di dalam mangkuk FP, lalu proses hingga tercampur rata. Masukkan kuning telur dan air, proses lagi hingga menggumpal. Uleni adonan hingga lembut. Tutup menggunakan plastik, dinginkan di kulkas selama 30 menit.
Panaskan oven, suhu sedang (moderate).
Giling adonan pastry hingga cukup lebar untuk memuat loyang tart bongkar pasang ukuran 24cm yang sudah diolesi mentega hingga ke sisi2nya. Letakkan pastry ke dalam loyang, tekan-tekan ke sisi-sisinya, lalu ratakan pinggirannya. Tutup, dinginkan di kulkas selama 30 menit.
Tutup pastry dengan baking paper, isi dengan kacang2an kering atau beras, letakkan di atas loyang oven. Panggang tanpa ditutup selama 15 menit. Keluarkan kertas dan kacang2an/beras, panggang lagi 10 menit hingga sedang kecoklatan. Dinginkan.

Chocolate Filling
4 kuning telur
2 butir telur
55g gula caster
80ml krim kental
300 DCC, lelehkan
1 sdt ekstrak vanilla
Buatlah pastry, lalu turunkan panas oven hingga suhu rendah (moderately slow).
Kocok kuning telur, telur dan gula caster di dalam mangkuk kecil dengan mixer hingga kental dan creamy. Masukkan krim, coklat dan ekstrak. Tuang adonan coklat ke dalam pastry yang sudah dipanggang. Panggang selama 30 menit atau hingga filling matang/set. Dinginkan selama 10 menit. Jika suka taburi dengan ekstra coklat bubuk, hidangkan.


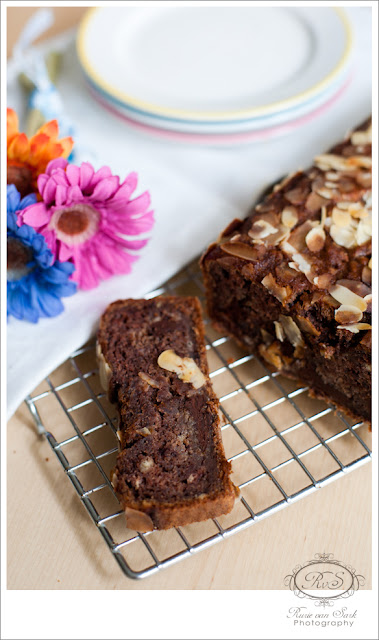
Since I joined an online Indonesian baking club KBB (klub berani baking) and they happened to have a bbg (blackberry group), words spread fast which and which recipe you should try. And since drooling over other member’s baking photo was not enough we had to try for ourselves. This banana bread came from Elsye, she ‘promoted’ the recipe with being dead easy, quick but yet delish. I tried it the other day when I needed a quick baking fix to ease my mind over overloaded work. And boy she was right, it was easy peasy, even no mixer was needed and most importantly delicious. I reckon you should try it as well.
Ingredients:
– 3 or 4 ripe bananas, smashed
– 1/3 cup melted butter
– 1 cup sugar (I used 3/4 cup)
– 1 egg, beaten
– 1 teaspoon vanilla
– 1 teaspoon baking soda
– Pinch of salt
– 1 1/2 cups of all-purpose flour
I added 1/2 cup of chopped dark chocolate and spread almond slices on the surface.
Directions:
No need for a mixer for this recipe. Preheat the oven to 350°F (175°C). With a wooden spoon, mix butter into the mashed bananas in a large mixing bowl. Mix in the sugar, egg, and vanilla. Sprinkle the baking soda and salt over the mixture and mix in. Add the flour last, mix. Pour mixture into a buttered 4×8 inch loaf pan. Bake for 1 hour. Cool on a rack. Remove from pan and slice to serve.

Source: Simply Recipes via Elsye Suranto

Hampir, HAMPIR aja kelewatan ikutan KBB bulan ini. Dikarenakan ujian akhir semester di sekolah yang udah di depan mata banget plus pursuing jadi photographer full time itu memang kerjaan full time banget. Anyway lupakan sejenak itu semua dan marilah kita nikmati lemon cheesecake yang super duper enyaks ini. Bikinnya sih nggak susah-susah banget secara aku juga suka bikin cheesecake tapiiii crustnya ini yg rada susah karena musti sampai ke sisi-sisinya, biasanya sih aku bikin cuma alasnya aja. Yuuk yuuk kita nikmati cheesecakenya.
Bahan-bahan :
Untuk 8-10 porsi
¼ cup port (aku ganti orange juice semua)
¼ cup orange juice
75g sultanas
150g mascarpone (berhubung belinya nggak liat-liat resep, jadinya mascarpone 400gr)
400g ricotta (dan ricotta 150gr)
125g gula kastor
2 btr telur, pisahkan kuning dan putihnya
3 buah lemon, parut kulitnya
60g tepung terigu
80g manisan apricot, iris tipis
Crust:
30g mentega tawar (aku tambah 30gr lagi karena kacang-kacanganya nggak cukup lembab)
185g kacang2an, haluskan (aku pakai almond meal)
8 sdt gula kastor
4 sdt dark brown sugar
½ sdt bubuk kayu manis
¼ sdt bubuk mixed spice

Cara Membuat:
Panaskan oven 170C. Siapkan loyang ukuran 23cm, olesi dasar dan sisi2 loyang dengan mentega leleh. Alasi dasar loyang dengan baking paper, lalu olesi mentega leleh.
Panasi port, orange juice, dan sultanas di dalam panci selama 5 menit. Angkat dari api, tutup dan biarkan selama 15 menit.
Crust: panaskan mentega hingga leleh, masukkan kacang2an, semua gula dan rempah-rempah; aduk rata. Letakkan di dasar dan sisi loyang, tekan-tekan supaya padat dan melekat.
Kocok mascarpone dan ricotta hingga lembut, lalu masukkan gula, kuning telur dan parutan kulit jeruk, lalu masukkan tepung, aduk hingga rata dan lembut. Masukkan campuran sultanas-port-orange juice dan apricots.
Kocok putih telur di dalam mangkuk yang bersih dan bebas lemak hingga soft peaks. Masukkan putih telur kocok ke dalam campuran keju. Tuang ke dalam loyang, ratakan permukaannya.
Letakkan loyang ke atas loyang oven/loyang biscuit (oven tray/baking tray), panggang selama 1 jam, atau hingga permukaan cheesecake set tengah2nya dan berwarna emas kecoklatan di sekelilingnya. Matikan oven. Biarkan cheesecake di dalam oven dengan pintu dibuka sedikit selama 50-60 menit.
Keluarkan cheesecake dari oven. Gunakan pisau tumpul secara perlahan ke sekeliling cheesecake, lalu biarkan hingga betul2 dingin. Keluarkan cheesecake dari loyang dan dinginkan dalam kulkas selama 2 jam sebelum disajikan.
Tips: olesi mentega leleh ke sekeliling loyang agak tebal sehingga crust kacang akan terbalut secara merata.

Maaf nih potonya seadanya dulu dari ipod, poto beneran menyusul *kejarsetoran
Sumber : Successful Baking
PS: Ini blogpost kenapa tiba-tiba berbahasa Indonesia? Ya kan ceritanya lagi buru-buru dan malas terjemahin. Yang perlu in English ayo ayo dibuka google translatornya.
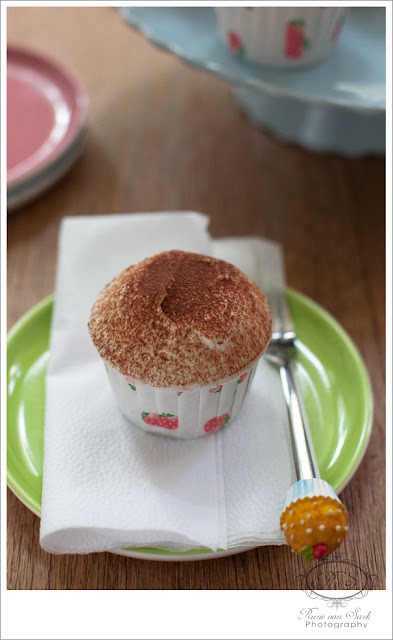
Another cupcake to complement the red velvet cupcake from last week’s post. Since I coulnd’t find tiramisu cupcake’s recipe from Hummingbird, I mix and match two recipes. The cupcake base was using vanilla cupcake recipe from Hummingbird while coffee syrup and mascarpone frosting were using Martha Stewart’s recipe. Now here is the recipe.
Vanilla Cupcake
Makes 12 (Since I used a bigger cupcake case, mine yielded 10 cupcakes)
Ingredients :
-120g/4oz plain flour
-140g/5oz caster sugar
-1½ tsp baking powder
-A pinch of salt
-40g/1½ oz unsalted butter, at room temperature
-120ml/4fl oz whole milk
-1 egg
-¼ tsp vanilla extract
-A 12-hole cupcake tray, lined with paper cases
Directions:
-Preheat the oven to 170C/325F/ Gas 3.
-Put the flour, sugar, baking powder, salt and butter in a freestanding electric mixer with a paddle attachment (or use a handheld electric whisk) and beat on slow speed until you get a sandy consistency and everything is combined.
-Gradually pour in half the milk and beat until the milk is just incorporated.
-Whisk the egg, vanilla extract and remaining milk together in a separate bowl for a few seconds, then pour into the flour mixture and continue beating until just incorporated (scrape any unmixed ingredients from the side of the bowl with a rubber spatula).
-Continue mixing for a couple more minutes until the mixture is smooth.
-Do not overmix.
-Spoon the mixture into the paper cases until two-thirds full and bake in the preheated oven for 20-25 minutes, or until light golden and the sponge bounces back when touched.
-A skewer inserted in the centre should come out clean.
-Leave the cupcakes to cool slightly in the tray before turning out onto a wire cooling rack to cool completely.
Coffee Syrup
Ingredients :
– 1/3 cup plus 1 tablespoon freshly brewed very strong coffee (or espresso)
– 30ml marsala (you can omit this or change it with other coffee based liquor)
– 1/4 cup sugar
Directions:
– Stir together coffee, marsala, and sugar until sugar is dissolved. Let cool.
Mascarpone Frosting
Ingredients :
– 1 cup (250ml) heavy cream
– 8 ounces (approx 250gr) mascarpone cheese, room temperature
– 1/2 cup (approx 100gr) confectioners’ sugar, sifted
Directions:
– With an electric mixer on medium speed, whisk heavy cream until stiff peaks form (be careful not to overbeat, or cream will be grainy).
– In another bowl, whisk together mascarpone and confectioners’ sugar until smooth.
-Gently fold whipped cream into mascarpone mixture until completely incorporated. Use immediately.
Finishing
– Poke the cupcakes with a fork until it forms holes, pour coffee marsala syrup over the cupcake, repeat until coffee syrup is finished.
– If you like you could make a small hole in the centre of the cupcake and fill that with mascarpone frosting.
– Frost with the mascarpone frosting and decorate with cocoa powder.
– Best eaten after being cooled for overnight in the fridge.
For more story and photos do “>visit my photography blog.
Source:
Vanilla Cupcake : Hummingbird Bakery
Coffee Syrup and Mascarpone Frosting : Martha Stewart’s
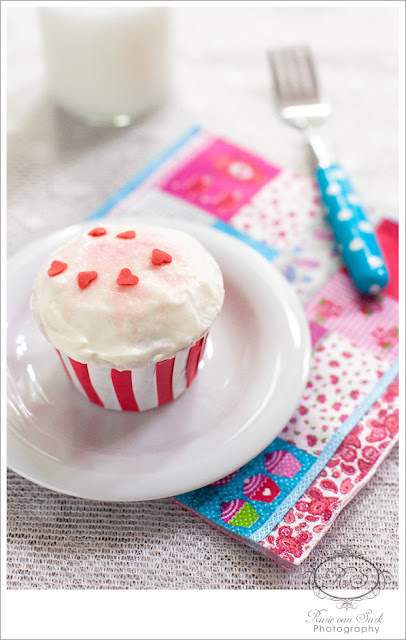
If you would like to read more story on this red velvet cupcake, do visit my photoblog here.
Prep time: 15 mins
Cook time: 20-25 mins
Yield: 12 cupcakes (mine yielded around 10 cupcakes since I used a bigger cupcake case)
Ingredients:
For the cupcakes
– 60g unsalted butter, at room temperature
– 150g caster sugar (I used 125gr)
– 1 egg
– 10g cocoa powder
– 20ml red food colouring (preferably Dr. Oetker brand) (I used 10ml)
– ½ tsp vanilla extract
– 120ml buttermilk
– 150g plain flour
– ½ tsp salt
– ½ tsp bicarbonate of soda
– 1½ tsp white wine vinegar
For cream cheese frosting: enough to cover 12 cupcakes
– 300g icing sugar, sifted (I used150g)
– 50g unsalted butter, at room temperature (I used 40g)
– 125g cream cheese, cold (I used 185g)
Directions:
For the cake
– Preheat the oven to 170°C. (my oven is an electric oven and they tend to be hotter than gas, so I used 150°C)
– Beat butter and the sugar on medium speed until light and fluffy and well mixed.
– Turn the mixer up to high speed, slowly add the egg and beat until everything is well incorporated.
– In a separate bowl, mix together the cocoa powder, red food colouring and vanilla extra ct to make a very thick, dark paste. Add to the butter mixture and mix thoroughly until evenly combined and coloured (scrape any unmixed ingredients from the side of the bowl with a rubber spatula).
– Turn the mixer up to slow speed, slowly pour in half the buttermilk.
– Beat until well mixed, then add half the flour and beat until everything is well incorporated. Repeat this process until all the buttermilk and flour have been added. Scrape down the side of the bowl again.
– Turn the mixer up to high speed and beat until you have a smooth, even mixture.
– Turn the mixer down to low speed and add the bicarbonate of soda and vinegar. Beat until well mixed, then turn up the speed again and beat for a couple more minutes.
– Pour into a lightly greased 6″ cake tin.
– Bake for about 40 mins or until done. Check for doneness by inserting a toothpick in t he middle, should come out clean if done.
– Leave to cool slightly in the tin before turning out onto a wire cooling rack to cool completely.
– Frost with cream cheese frosting. For cream cheese frosting:
– Beat the icing sugar and butter together on medium-slow speed until the mixture comes to gether and is well mixed.
– Add the cream cheese in one go and beat until it is completely incorporated.
– Turn the mixer up to medium-high speed. Continue beating until the frosting is light and fluffy (at least five minutes). Do not overbeat, as it can quickly become runny.
Source: The Hummingbird Bakery Cookbook

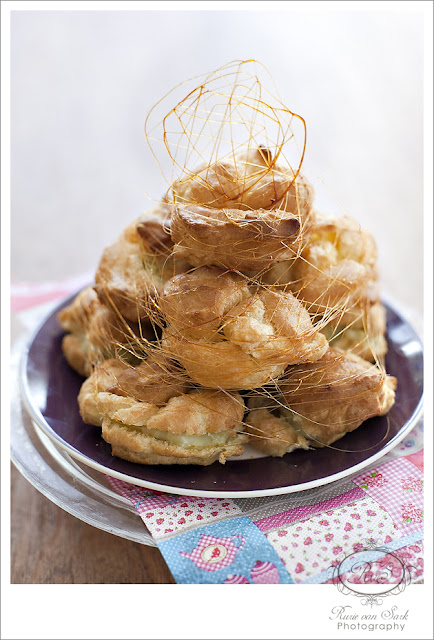
Upon reading this month’s challenge my mind wandered to one particular series, Desperate Housewives. There was this particular episode where Bree van de Kamp couldn’t perform the making of spun sugar for her croquembouche. With that thought I cringe, if the domestic goddess Mrs. van de Kamp couldn’t make it then what about me? But it wouldn’t be KBB if not without challenge. Though I only tried it once, that after looking at tips and tricks from my fellow KBB’ers, I have to say was way far than perfect but I’m glad I did try it and BRAVO KBB. Recipe for the Choux Pastry with Custard Filling can be found here


Spun Sugar
Ingredients:
– 100 gr sugar
– 1 tsp water
– Heat sugar with water in a sauce pan in a lowest fire possible, use the smallest hob you have.
– Don’t stir with spoon etc just shake the handle now and then
– Heat through until caramelized, take off from the fire and let it cool down for some minutes.
– Take two chopsticks, sticks your caramel on the edge. Stick the two chopsticks together and take them apart from each other, by now your spun sugar should be ready to be rolled around your choux pastry.
– Repeat until you are satisfied with the result.
– For the top decoration, lay a piece of baking paper on the counter, use a fork/spoon to make pattern of your choice.
– Let it cool for couple of minutes and ready to be used.


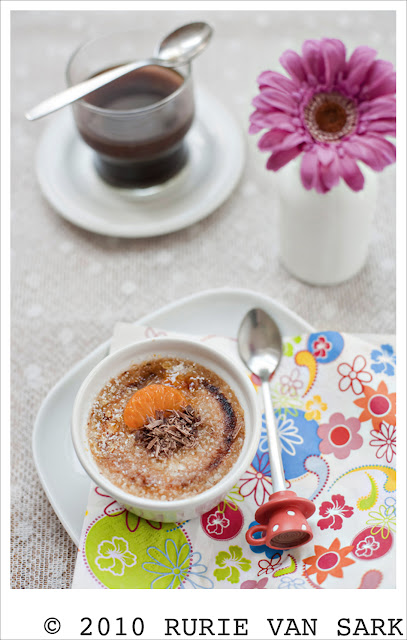
Me and hubby were literally fighting over the last bit of this dessert because it was SO GOOD! There I said it with capital letters. It was velvetty chocolatty (does this word exist?) without being over powered, perfect dessert. If I got no competition I bet I would gobble it all by myself. Having said that I never made creme brulee before because I thought it would be so darn difficult. It turned out not at all! Ah this is why I love love my KBB, the group has challenged it’s member in every aspect of baking we didn’t know we could.
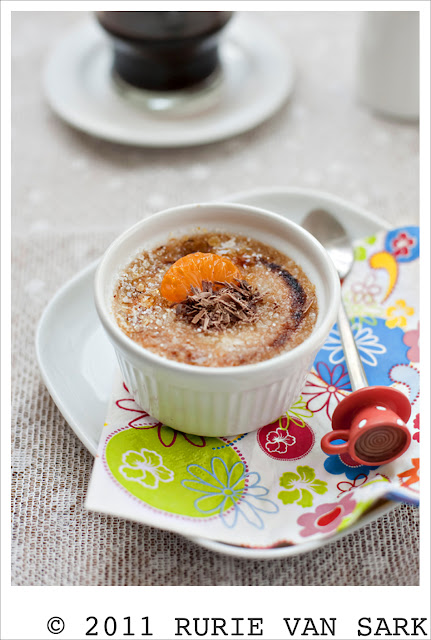
Serves 6 ramekins (I made half recipe which yielded into 4 ramekins)
Ingredients:
– 300g fresh rhubarb (didn’t use this, instead I used 150gr good quality milk chocolate)
– 3 Tbs caster sugar
– 2 vanilla pods
– 300ml double cream
– 200ml full fat milk
– 8 egg yolks
– 80g sugar (reduced until 50gr)
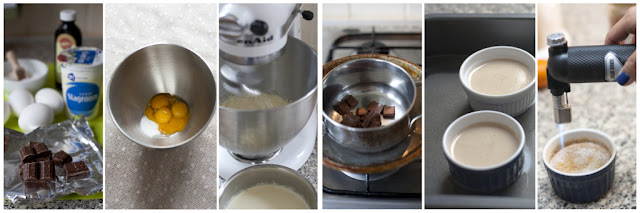
Directions:
– Preheat the oven to 140C/275F/Gas
– Roughly slice up the rhubarb and place it in a pan with the caster sugar and 5 tablespoons of water. Simmer until tender, divide between 6 small serving dishes which your brulee will be cooked in, then set aside. (omitted this but insted melt milk chocolate in a double boiler or microwave will do)
– Score the vanilla pods lengthwise and run the knife up the pod to remove the vanilla seeds. Scrape these into the pan with the pods, cream and milk and slowly bring to the boil.
– Meanwhile beat together the yolks and the sugar in a bowl until light and fluffy. When the cream and milk are just boiling, remove the vanilla pods and add little by little to the egg mixture, (add the melted milk chocolate also at this point) whisking continuously. I like to remove any bubbles or froth from the mixture before dividing it into the serving dishes, on top of the rhubarb.
– Stand these in an appropriately sized roasting tray filled with water half way up the containers, and bake in the pre-heated oven for around 25 minutes until the custard mixture has set but is still slightly wobbly in the centre.
– Allow to cool to room temperature then place in the fridge until ready to serve. Sprinkle with sugar and caramelize under a very hot grill or using a kitchen blowtorch. Lovely.
Source: Book Naked Chef 2 by Jamie Oliver
I made this for Christmas lunch dessert, it was easy (remember easy is my middle name) but with a stunning result as if you spent a lot of time on it. Well actually what I needed to do was peel the pears and boil them with the rest of ingredients for couple of hours.
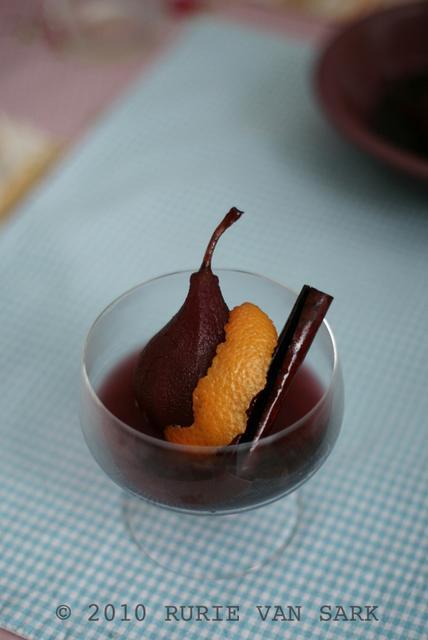
Ingredients:
– 1 vanilla pod
– 1 bottle red wine (use the cheapest one, it doesn’t really matter)
– 225 gr caster sugar
– 1 cinnamon stick, halved
– 1 thyme spring (I didn’t use it)
– 6 pears, peeled but kept whole with stalk intact
Directions:
- Halve the vanilla pod lengthways, scrape out the black seeds and put in a large saucepan with the wine, sugar, cinnamon and thyme. Cut each piece of pod into three long thin strips, add to pan, then lower in the pears.
- Poach the pears, covered, for 20-30 mins, making sure they are covered in the wine. The cooking time will very much depend on the ripeness of your pears – they should be tender all the way through when pierced with a cocktail stick. You can make these up to 2 days ahead and chill.
- Take the pears from the pan, then boil the liquid to reduce it by half so that it’s syrupy (I didn’t do this I actually like the syrupy part). Serve each pear with the cooled syrup, a strip of vanilla, a piece of cinnamon and a small thyme sprig.
Source: BBC GoodFood
|
Awards
 My First Award, Thank You!
Whittycute Foodie Event
 Click here to see the round up!
|