|
|

Nggak terasa waktunya untuk KBB lagi, udah yang ke 24. Wow, eh tapi tanpa event spt KBB rasanya kok ini blog nggak keisi2 ya…duh. Anyway ini baru pertama kali bikin pie, kupikir ngaduk adonan pienya musti manual ternyata nggak juga, bisa pake FP, YAY! Walaupun sesudah diaduk di FP dan didinginkan di kulkas 30 menit kok tetep ambrol adonan kulit pienya. Ya sudahlah tetep bisa dicetak kok. Karena nggak punya cetakan pie aku pakai cetakan pie kertas sekali pakai dan berhasil juga. Filling coklatnya bikinnya gampang, tinggal aduk dan tuang, aku ngovennya juga nggak lama-lama banget supaya fillingnya nggak kering dan tetep basah-basah. Rasa pienya wow legit banget, nyoklat banget, makannya musti sedikit-sedikit loh. All in all senang udah belajar bikin pie. Kalau nggak karena KBB, nggak mungkin deh.

Sumber: Best Food: Desserts. The Australian Women Weekly.
Untuk 10 porsi

Pastry
185g tepung terigu
25g coklat bubuk
55g icing sugar mixture
150g mentega dingin, cincang
2 kuning telur
1 sdt air dingin
Campur tepung, bubuk coklat, gula dan mentega di dalam mangkuk FP, lalu proses hingga tercampur rata. Masukkan kuning telur dan air, proses lagi hingga menggumpal. Uleni adonan hingga lembut. Tutup menggunakan plastik, dinginkan di kulkas selama 30 menit.
Panaskan oven, suhu sedang (moderate).
Giling adonan pastry hingga cukup lebar untuk memuat loyang tart bongkar pasang ukuran 24cm yang sudah diolesi mentega hingga ke sisi2nya. Letakkan pastry ke dalam loyang, tekan-tekan ke sisi-sisinya, lalu ratakan pinggirannya. Tutup, dinginkan di kulkas selama 30 menit.
Tutup pastry dengan baking paper, isi dengan kacang2an kering atau beras, letakkan di atas loyang oven. Panggang tanpa ditutup selama 15 menit. Keluarkan kertas dan kacang2an/beras, panggang lagi 10 menit hingga sedang kecoklatan. Dinginkan.

Chocolate Filling
4 kuning telur
2 butir telur
55g gula caster
80ml krim kental
300 DCC, lelehkan
1 sdt ekstrak vanilla
Buatlah pastry, lalu turunkan panas oven hingga suhu rendah (moderately slow).
Kocok kuning telur, telur dan gula caster di dalam mangkuk kecil dengan mixer hingga kental dan creamy. Masukkan krim, coklat dan ekstrak. Tuang adonan coklat ke dalam pastry yang sudah dipanggang. Panggang selama 30 menit atau hingga filling matang/set. Dinginkan selama 10 menit. Jika suka taburi dengan ekstra coklat bubuk, hidangkan.


Hampir, HAMPIR aja kelewatan ikutan KBB bulan ini. Dikarenakan ujian akhir semester di sekolah yang udah di depan mata banget plus pursuing jadi photographer full time itu memang kerjaan full time banget. Anyway lupakan sejenak itu semua dan marilah kita nikmati lemon cheesecake yang super duper enyaks ini. Bikinnya sih nggak susah-susah banget secara aku juga suka bikin cheesecake tapiiii crustnya ini yg rada susah karena musti sampai ke sisi-sisinya, biasanya sih aku bikin cuma alasnya aja. Yuuk yuuk kita nikmati cheesecakenya.
Bahan-bahan :
Untuk 8-10 porsi
¼ cup port (aku ganti orange juice semua)
¼ cup orange juice
75g sultanas
150g mascarpone (berhubung belinya nggak liat-liat resep, jadinya mascarpone 400gr)
400g ricotta (dan ricotta 150gr)
125g gula kastor
2 btr telur, pisahkan kuning dan putihnya
3 buah lemon, parut kulitnya
60g tepung terigu
80g manisan apricot, iris tipis
Crust:
30g mentega tawar (aku tambah 30gr lagi karena kacang-kacanganya nggak cukup lembab)
185g kacang2an, haluskan (aku pakai almond meal)
8 sdt gula kastor
4 sdt dark brown sugar
½ sdt bubuk kayu manis
¼ sdt bubuk mixed spice

Cara Membuat:
Panaskan oven 170C. Siapkan loyang ukuran 23cm, olesi dasar dan sisi2 loyang dengan mentega leleh. Alasi dasar loyang dengan baking paper, lalu olesi mentega leleh.
Panasi port, orange juice, dan sultanas di dalam panci selama 5 menit. Angkat dari api, tutup dan biarkan selama 15 menit.
Crust: panaskan mentega hingga leleh, masukkan kacang2an, semua gula dan rempah-rempah; aduk rata. Letakkan di dasar dan sisi loyang, tekan-tekan supaya padat dan melekat.
Kocok mascarpone dan ricotta hingga lembut, lalu masukkan gula, kuning telur dan parutan kulit jeruk, lalu masukkan tepung, aduk hingga rata dan lembut. Masukkan campuran sultanas-port-orange juice dan apricots.
Kocok putih telur di dalam mangkuk yang bersih dan bebas lemak hingga soft peaks. Masukkan putih telur kocok ke dalam campuran keju. Tuang ke dalam loyang, ratakan permukaannya.
Letakkan loyang ke atas loyang oven/loyang biscuit (oven tray/baking tray), panggang selama 1 jam, atau hingga permukaan cheesecake set tengah2nya dan berwarna emas kecoklatan di sekelilingnya. Matikan oven. Biarkan cheesecake di dalam oven dengan pintu dibuka sedikit selama 50-60 menit.
Keluarkan cheesecake dari oven. Gunakan pisau tumpul secara perlahan ke sekeliling cheesecake, lalu biarkan hingga betul2 dingin. Keluarkan cheesecake dari loyang dan dinginkan dalam kulkas selama 2 jam sebelum disajikan.
Tips: olesi mentega leleh ke sekeliling loyang agak tebal sehingga crust kacang akan terbalut secara merata.

Maaf nih potonya seadanya dulu dari ipod, poto beneran menyusul *kejarsetoran
Sumber : Successful Baking
PS: Ini blogpost kenapa tiba-tiba berbahasa Indonesia? Ya kan ceritanya lagi buru-buru dan malas terjemahin. Yang perlu in English ayo ayo dibuka google translatornya.

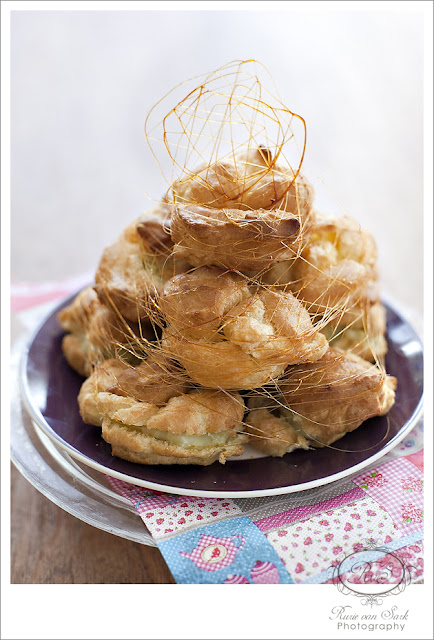
Upon reading this month’s challenge my mind wandered to one particular series, Desperate Housewives. There was this particular episode where Bree van de Kamp couldn’t perform the making of spun sugar for her croquembouche. With that thought I cringe, if the domestic goddess Mrs. van de Kamp couldn’t make it then what about me? But it wouldn’t be KBB if not without challenge. Though I only tried it once, that after looking at tips and tricks from my fellow KBB’ers, I have to say was way far than perfect but I’m glad I did try it and BRAVO KBB. Recipe for the Choux Pastry with Custard Filling can be found here


Spun Sugar
Ingredients:
– 100 gr sugar
– 1 tsp water
– Heat sugar with water in a sauce pan in a lowest fire possible, use the smallest hob you have.
– Don’t stir with spoon etc just shake the handle now and then
– Heat through until caramelized, take off from the fire and let it cool down for some minutes.
– Take two chopsticks, sticks your caramel on the edge. Stick the two chopsticks together and take them apart from each other, by now your spun sugar should be ready to be rolled around your choux pastry.
– Repeat until you are satisfied with the result.
– For the top decoration, lay a piece of baking paper on the counter, use a fork/spoon to make pattern of your choice.
– Let it cool for couple of minutes and ready to be used.

This traditional Indonesian cookie was unheard of until now 🙂 our online baking club decided to showcase this kept treasure to the rest of the world, and that we do together with other online club NCC. Having never heard nor tasted the cookie I couldn’t imagine what the taste would like though I have heard from other friends who have tried it that it was indeed a melt-in-your-mouth kinda cookie. I was intriqued, so here we are my first bangket.
I did add more butter (didn’t have margarine so I used butter) to the dough as my dough didn’t hold itself. It was more like a heap of flour I couldn’t mold at all. At. All. After adding more butter it was allright. Friends in Indonesia used special mold for this but I didn’t have any. Though in Holland we do have the same type of mold for making speculaas, but it’s ok I didn’t have it so instead I used mini muffin silicon mold. It worked perfectly fine. Later that night some friends came over and tasted the cookies. They say the cookies looked like candy but tasted like cookies.
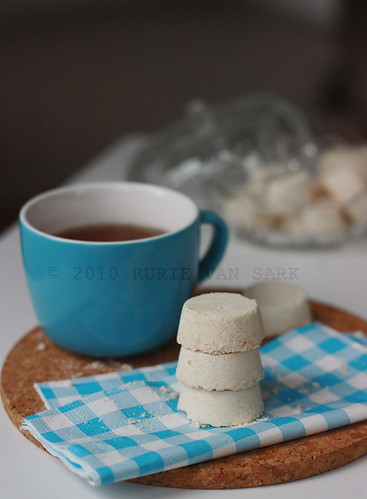
Bangket Susu (Milk Bangket)
Ingredients:
– 500 gr tapioca flour
– 100 gr margarine (I used butter and added some more later on)
– 150 gr powder sugar (was way too sweet for my own tastebuds, will reduce later)
– 75 gr condensed milk
– 2 pandan leaves

Directions:
– Pan broil the flour with pandan leaves until light, set aside to cold.
– Mix everything by hand
– Mold with kue satu mold (speculaas mold)
– Bake with low fire (140 C) approx 10-15 minutes
– Move cookies when it’s cold.
– This cookies are very fragile, arrange them in the tin and don’t move it around anymore unless you’re going to eat it 😉
Source: Nadrah Shahab
![masakbareng[1]](../../../../wp-content/uploads/masakbareng14-150x150.png)
In Bali there are many delicacies that you have to try including this famous Nasi Ayam. There are many places where you can savour this dish and each warung (food stall) will have their own variation but the main theme still would be deliciously spicy chicken dishes. Make sure you wouldn’t miss this next time you visit paradise island of Bali.
My nasi ayam consists of:
– Steamed white rice
– Jukut Urap (Balinese Vegetable Salad with Coconut Dressing)
– Telor Pindang (Boiled Marbled Egg)
– Tum Ayam (Balinese Steamed Chicken in Banana Leaves)
– Ayam Pelalah (Balinese Spicy Shredded Chicken)
– Siap Mesanten (Chicken in Coconut Milk Sauce)
– Sambal Matah (Balinese Raw Sambal)
– Kacang Goreng (Fried Peanuts)
I have indeed posted all the other recipes except Siap Mesanten and Telor Pindang, if you would like to find out the other recipes, just click on the link above.
This Siap Mesanten recipe came from my best friend in Indonesia. We have known each other since the 1st grade of SMP (Junior High School), and yes it’s been a long time. As I write this I remember all the memories, all the ups and downs we’ve passed through together. Now she is a mom with two beautiful daughtesr as well a super great home cook especially with Balinese dishes. Yes I miss her dearly (and her cooking too) ^^
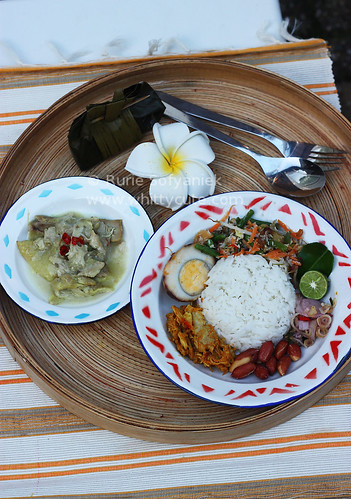
Siap Mesanten
Ingredients:
– 300gr chicken pieces
Base siap:
– 2 cloves garlic, bruised
– 2 cm turmeric, bruised
– 1/2 tsp salt
– Sprinkle of sugar
Base Kele:
– 1 tsp black pepper
– 3 cloves garlic
– 1 cm lesser galangal
– 2 cloves candlenuts
– 2 lime leaves
– 2 salam leaves
– 1 lemongrass, bruised
– Sambal Embe
– 200 ml thick coconut milk
– 2 tsp vegetable oil
Directions:
– Boil chicken pieces base siap and enough water to cover the chicken pieces until done, set it aside
– Pound Base kele ingredients until smooth except the leaves and lemongrass.
– Heat vegetable oil in a pan and fry pound spices until fragrant and done.
– Pour thick coconut and let it boil. Add chicken pieces with some of the broth.
– Let it cooked until done, adjust the taste.
– Serve with sambal embe.
Telor Pindang
Ingredients:
– 6 eggs
– 1 daun jati (teak leaves) (I didn’t have these instead I used 4 black tea bags)
– 2 tbsp shallots skin
– 1 galangal, bruised
– 2 salam leaves
– 1 lemongrass, bruised
– 1 tbsp salt
– Sprinkled of sugar
Directions:
– In a deep pan placed all ingredients along with enough waters to cover the eggs.
– Boil for 15 minutes until the eggs is hard, take the egss one by one while continue cooking. Tap the egg gently on a surface until it cracked but the skin still intact with the egg, return to the pan.
– Continue cooking with low fire for 1 hour until water has evaporated, peeled and ready to eat.

Happy Birthday KBB, Hip Hip Hoera! This is my second birthday with KBB but KBB itself is celebrating it’s 3rd birthday and on this very birthday we can choose our own task from all the previous task that KBB. I chose this pizza since I didn’t participate in this task and also I never made my own pizza base before (In Holland, I have made pizza base many times before in Indonesia)
One word from me, don’t hesitate to make this at home, the dough was smooth literally after 5-7 minutes, so no big energy required here 😉
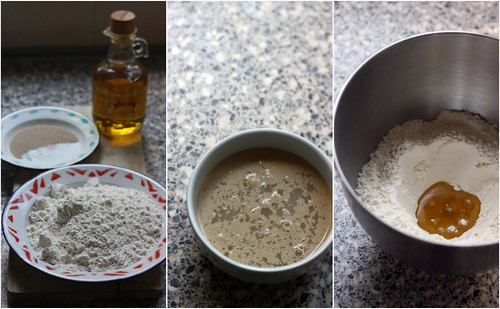
Pizza base:
– 1 sachet (@ 7g = 1/4 oz = 2 tsp) dry yeast
– 1tsp sugar
– 2 ½ cups bread flour (high-grade flour, tepung protein tinggi)
– Salt (I used 1/4 tsp)
– 2 tbsp olive oil
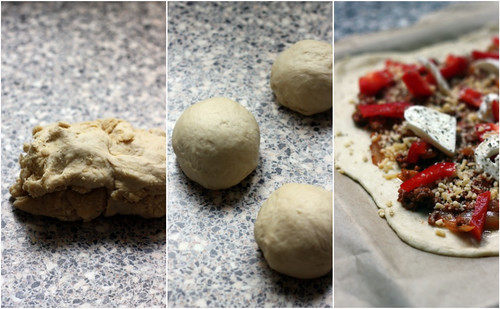
Direction:
– Dissolve the yeast and sugar in a small bowl with 200ml (6 ½ fl oz) of tepid water. Stir well and set aside for 10 minutes, or until the mixture froths.
– Place the flour and a pinch of salt in a large mixing bowl. Make a well in the centre and add the yeast mixture and olive oil. Mix until a firm dough forms. Knead on a lightly floured surface for 5-7 minutes, or until smooth and elastic.
– Place in a clean, lightly oiled bowl, cover with a cloth or plastic wrap and leave in a warm place for 1-1 ½ hours, or until the dough has doubled in size. Preheat the oven to 210C (415F, Gas Mark 6-7).-
– Punch down the dough with your fist to release the air. Divide into two or three equal portions and roll out or press to a thickness of 4-5mm (¼ in). Transfer to lightly oiled pizza trays.
-Top with your choice of toppings and cook for 15 minutes. Then slide the pizza off the tray onto the oven shelf and cook for a further 3-4 minutes, to crisp up the base.
Source: The Perfect Cookbook. David Herbert. Viking. Victoria,Australia. 2003
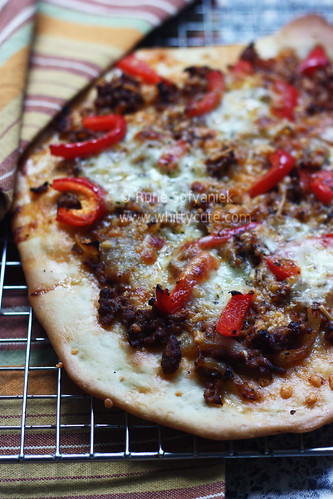
Bolognese Topping:
– 1/2 portion of bolognese sauce
– 1 red bell pepper sliced
– Shredded Gouda Cheese
– 1 ball fresh mozzarelle cheese

![masakbareng[1]](../../../../wp-content/uploads/masakbareng13.png)
My better half does like fish but not those with strong fish smell or taste, is that weird or what? Though after looking at people around me, most people here don’t like the kind of fish that we like with strong fish smell and taste such as pempek palembang, siomay, batagor or even ikan pindang. This fish and chips he does like because the fish was white with delicate flavour and texture, one of his favorite.
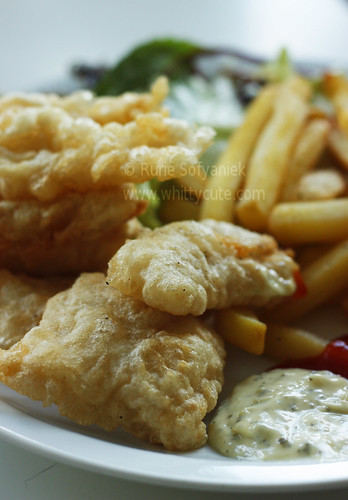
Ingredients:
– 650g (approx) skinless haddock, hake or cod fillet from a sustainable source, cut into 4 equal-size pieces
– 50g self-raising flour , plus 1 tbsp
– 50g cornflour
– 1 egg white
– 125ml ice-cold sparkling water
– 1 lemon cut into wedges
– 600ml sunflower oil , for frying
Directions:
– Pat the fillets dry with paper towels. Put the 1 tbsp of flour on a plate and use to coat each fillet, patting off the excess.
– Pour the oil for frying into a heavy, medium non-stick wok or wokshaped pan. Heat to 200C (use a thermometer so you can check the oil stays at that temperature).
– Mix 50g flour, cornflour, a pinch of salt and some pepper. Lightly whisk the egg white with a balloon whisk until frothy and bubbly, but not too stiff. Pour the water into the flour mix, gently and briefly whisking as you go. The batter shouldn’t be completely smooth. Add the egg white, then lightly whisk in just to mix. Try and keep as many bubbles as you can so the batter stays light.
– Cooking two pieces of fish at a time, dip them in the batter to coat, let some of it drip off, then lower into the hot oil using a slotted spoon. Fry for 5-6 mins, making sure the oil stays at 200C and turning the fish over halfway through so it is golden all over. Lift out with a slotted spoon, drain on kitchen paper. Check the oil is back up to 200C, then repeat with remaining fish. Serve the fish with chips and lemon wedges.
Source: BBC GoodFood
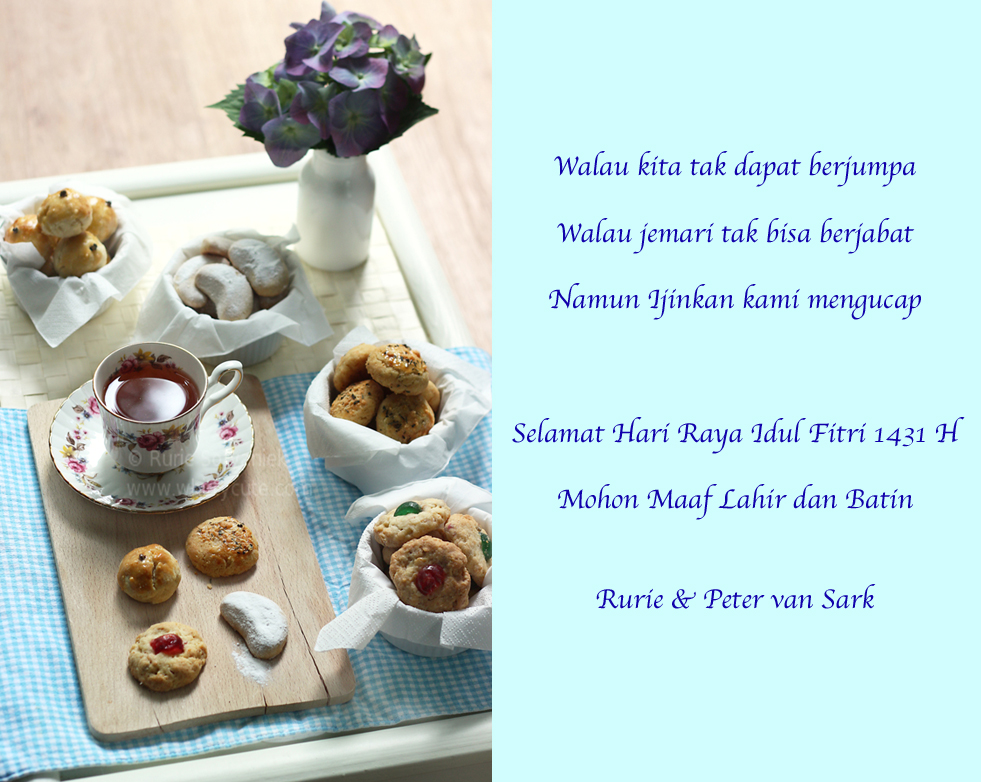
From top left to bottom right; Nastar (Pineapple Tart), Putri Salju (Snow White Cookies), Pizza Cheese Button, Cornflake Cookies. (Recipe will follow soon)
![masakbareng[1]](../../../../wp-content/uploads/masakbareng12.png)
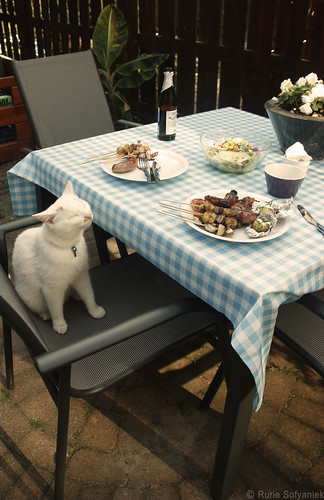
I know summer’s almost over, the past week has been nothing but bad weather. Yesterday we were on our way home from a friend’s birthday, it was still 8pm but the sky was like nothing like I’ve ever seen, black on one side with a flash of lightning every 5 minutes. We thought where did the summer go? But anyway we could still enjoy summer from these photos when we BBQ-ed couple weeks ago. We made some simple BBQ of vegetable satay (mushroom, onion bell pepper), shrimp, sausage, chicken wing, salad and not forgetting very easy yet delicious grilled potato. I’m going to share the recipe for the grilled potato here, though it was not an extravaganza but it was so good I had to share it with you all. I don’t know whether it was because it was grilled potato or the spices or the final touch of sourcream. Anyway lets enjoy this grilled potato and the rest of the summer before it’s gone before your eyes.
For all of you who are interested in joining MasBar do stop by at our site.
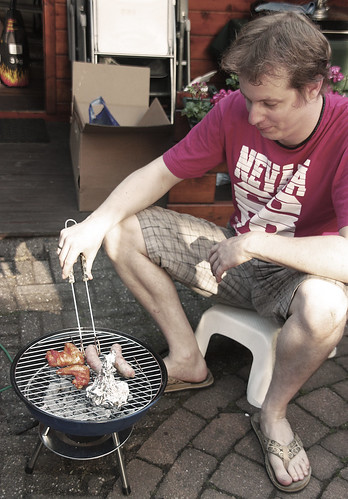
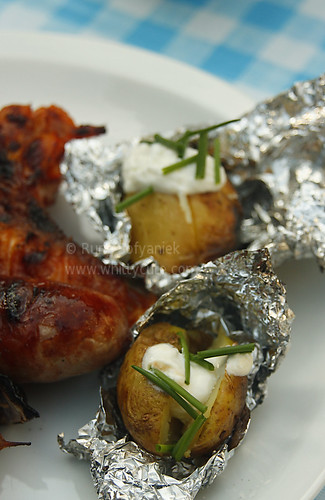
For 4 persons
Ingredietns:
– 8 medium firm potatoes
– Olive oil
– 4 garlic smoothyly pounded
– Salt
– 1 tsp dried rosemary
– Chopped chives
– 1 small tub sourcream
Directions:
– Wash the potatoes but don’t peel them, when they are cleaned prick the potatoes with fork.
– In a bowl mix olive oil, salt and rosemary and rub the mixture on the potatoes. Meanwhile cut 8 squares of aluminium foil and wrap the potatoes individually. Pour the remaining olive oil mixture in the potato package.
– Baked the potatoes straight inside the BBQ for 20 minutes while not forgetting to turn them once a while.
– Serve with chopped chive and a dollop of sourcream

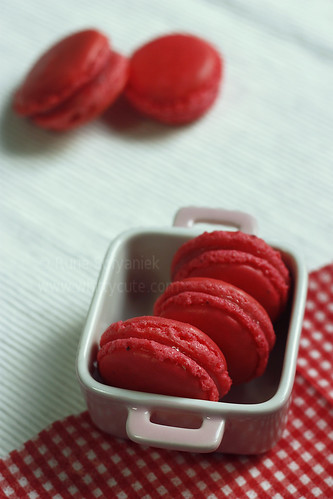
I first saw this in Paris couple years ago and immediately thought wow what a cute little morsels, so pretty with many colors and flavour but darn they weren’t cheap either. Ever since I bump into macarons here and there over the net but never did I got the guts to try it out, for I heard that they weren’t easy to make hence the price tag. Until earlier this month we at KBB received the challenge that I had to make it but I would be forever thankful to KBB, if not for this challenge I don’t know when would I have the courage.
As I ran out of time to do some try outs, so this was my first ever macarons and I think they turned out not so bad. I got the s0-called feet, YAY. Moreover I love this macarons more than shop bought version since this I found not too tooth achingly sweet, just perfect with a cup of coffee.
All in all some conclusion that I could make:
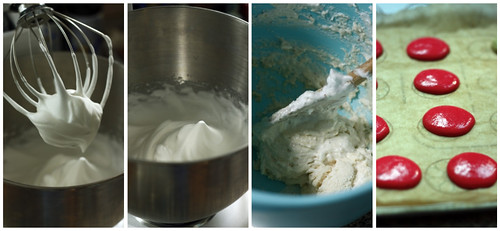
– Important to not over whip your egg white.
– Do not overbeat.
– Let it stand outside for aproximately 1 hour.
– Make sure the oven temperature is low at 140C.
Basic French Meringue
For the shells:
– 90 gr egg whites (use eggs whites that have been preferably left 3-5 days in the fridge)
– 25 gr granulated sugar
– 200 gr powdered sugar
– 110 gr almonds (slivered, blanched, sliced, whatever you like) (I used almond meal)
– (I used 1 drop red gel food coloring)
Prepare the macarons:
– In a stand mixer fitted with the whisk attachment, whip the egg whites to a foam, (think bubble bath foam) gradually add the sugar until you obtain a glossy meringue (think shaving cream). Do not overbeat your meringue or it will be too dry.
– Place the powdered sugar and almonds and powdered color in a food processor and give them a good pulse until the nuts are finely ground.
– Add them to the meringue, give it a quick fold to break some of the air and then fold the mass carefully until you obtain a batter that falls back on itself after counting to 10.
– Give quick strokes at first to break the mass and slow down. The whole process should not take more than 50 strokes. Test a small amount on a plate: if the tops flattens on its own you are good to go. If there is a small beak, give the batter a couple of turns.
-Fill a pastry bag fitted with a plain tip (Ateco #807 or #809) with the batter and pipe small rounds (1.5 inches in diameter) onto parchment paper or silicone mats lined baking sheets.
– Let the macarons sit out for 30 minutes to an hour to harden their shells a bit. In the meantime, preheat the oven to 280F.
– When ready, bake for 15 to 20 minutes, depending on their size. Let cool. Once baked and if you are not using them right away, store them in an airtight container out of the fridge for a couple of days or in the freezer.
White Chocolate Raspberry Ganache:
– 1/2 cup cream
– 1 1/2 cup white chocolate
– 1/3 cup good quality raspberry jam
– Heat the cream until hot, drom white chocolate and raspberry jam into the cream and stir until all are melted and come together.
– Let cool and firm enough to pipe or spoon onto the macarons shells.
Source: Helen Dujardin

|
Awards
 My First Award, Thank You!
Whittycute Foodie Event
 Click here to see the round up!
|


![masakbareng[1]](../../../../wp-content/uploads/masakbareng14-150x150.png)


![masakbareng[1]](../../../../wp-content/uploads/masakbareng13.png)


![masakbareng[1]](../../../../wp-content/uploads/masakbareng12.png)


